
HP CIFS Server Administrator Guide Version A.03.01.03 (5900-2006, October 2011)
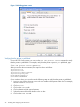
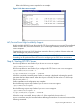
Table Of Contents
- HP CIFS Server Administrator Guide Version A.03.01.03
- Contents
- About this document
- 1 Introduction to the HP CIFS Server
- 2 Installing and configuring HP CIFS Server
- HP CIFS Server requirements and limitations
- Step 1: Installing HP CIFS Server software
- Step 2: Running the configuration script
- Step 3: Modify the configuration
- Step 4: Starting HP CIFS Server
- Other Samba configuration issues
- 3 Managing HP-UX file access permissions from Windows NT/XP/2000/Vista/Windows 7
- Introduction
- UNIX file permissions and POSIX ACLs
- Using the Windows NT Explorer GUI to create ACLs
- Using the Windows Vista Explorer GUI to create ACLs
- POSIX ACLs and Windows 2000, Windows XP, Windows Vista, and Windows 7 clients
- HP CIFS Server Directory ACLs and Windows 2000, Windows XP, Windows Vista, and Windows 7 clients
- In conclusion
- 4 Windows style domains
- Introduction
- Configure HP CIFS Server as a PDC
- Configure HP CIFS Server as a BDC
- Domain member server
- Create the Machine Trust Accounts
- Configure domain users
- Join a Windows client to a Samba domain
- Roaming profiles
- Configuring user logon scripts
- Home drive mapping support
- Trust relationships
- 5 Windows 2003 and Windows 2008 domains
- 6 LDAP integration support
- Overview
- Network environments
- Summary of installing and configuring
- Installing and configuring your Directory Server
- Installing LDAP-UX Client Services on an HP CIFS Server
- Configuring the LDAP-UX Client Services
- Enabling Secure Sockets Layer (SSL)
- Extending the Samba subschema into your Directory Server
- Migrating your data to the Directory Server
- Configuring the HP CIFS Server
- Creating Samba users in directory
- Management tools
- 7 Winbind support
- 8 Kerberos support
- 9 HP CIFS deployment models
- Introduction
- Samba Domain Model
- Windows Domain Model
- Unified Domain Model
- 10 Securing HP CIFS Server
- 11 Configuring HA HP CIFS
- 12 HP-UX configuration for HP CIFS
- 13 Tool reference
- Glossary
- Index
There are two possible locations (subdirectories) for keeping driver files, depending upon
what version of Windows the files are for:
For Windows NT, XP, Windows 2000, Vista, or Windows 7 driver files, the files will be stored
in the /etc/opt/samba/printers/W32X86 subdirectory.
For Windows 9x driver files, the files will be stored in the /etc/opt/samba/printers/Win40/0
subdirectory.
Setup Client for automatically uploading of printer drivers
Printer driver files can be automatically uploaded from disk to the printers on a HP CIFS Server.
Here are the steps:
1. Connect to CIFS Server by running the \\[server name] command or browse to CIFS
Server through Network Neighborhood.Make sure you are connected as a member of
the printer admin list.
2. From the CIFS Server, double click on the "Printers" or "Printers and Faxes" folder. A list of
printers available from your CIFS Server will be shown in the folder. Viewing the printer
properties will result in the error message:
The printer driver is not installed on this computer. Some printer
properties will not be accessible unless you install the printer
driver. Do you want to install the driver now?
3. Click "no" in the error dialog and the printer properties window will be displayed.
4. Click on the 'Advanced' tab, then the 'New Driver..." button.
5. Select the printer driver e.g. HP LaserJet 5i. You will be asked for the driver files. Give the
path where the driver files are located. The driver files will be uploaded from the disk, and
stored into the subdirectories under the [print$] share.
Publishing printers in an MS Windows 2000/2003/2008 ADS Domain
Publishing printers makes HP CIFS Server printers searchable in an Microsoft Windows 2000/2003
ADS domain. If a Windows client is a domain member of the ADS domain, that client can search
for the printer and install it.
Setting up HP CIFS Server for publishing printers support
Use the following procedures to set up an HP CIFS Server for publishing printers support:
1. Create the printer shares for each printer and a [printers] share in the smb.conf file.
The following is an example of a [printers] share:
[printers]
path = /tmp
printable = yes
browseable = yes
See the following example for setting up a specific printer share, where lj1005 is the name
of the printer:
[lj1005]
path = /tmp
printable = yes
2. Create a [print$] share in the smb.conf file and set the path parameter to a directory named
/etc/opt/samba/printers. See the following example:
[print$]
path = /etc/opt/samba/printers
use client driver = no
24 Installing and configuring HP CIFS Server