
HP CIFS Server Administrator Guide Version A.03.01.03 (5900-2006, October 2011)
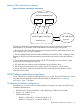
Table Of Contents
- HP CIFS Server Administrator Guide Version A.03.01.03
- Contents
- About this document
- 1 Introduction to the HP CIFS Server
- 2 Installing and configuring HP CIFS Server
- HP CIFS Server requirements and limitations
- Step 1: Installing HP CIFS Server software
- Step 2: Running the configuration script
- Step 3: Modify the configuration
- Step 4: Starting HP CIFS Server
- Other Samba configuration issues
- 3 Managing HP-UX file access permissions from Windows NT/XP/2000/Vista/Windows 7
- Introduction
- UNIX file permissions and POSIX ACLs
- Using the Windows NT Explorer GUI to create ACLs
- Using the Windows Vista Explorer GUI to create ACLs
- POSIX ACLs and Windows 2000, Windows XP, Windows Vista, and Windows 7 clients
- HP CIFS Server Directory ACLs and Windows 2000, Windows XP, Windows Vista, and Windows 7 clients
- In conclusion
- 4 Windows style domains
- Introduction
- Configure HP CIFS Server as a PDC
- Configure HP CIFS Server as a BDC
- Domain member server
- Create the Machine Trust Accounts
- Configure domain users
- Join a Windows client to a Samba domain
- Roaming profiles
- Configuring user logon scripts
- Home drive mapping support
- Trust relationships
- 5 Windows 2003 and Windows 2008 domains
- 6 LDAP integration support
- Overview
- Network environments
- Summary of installing and configuring
- Installing and configuring your Directory Server
- Installing LDAP-UX Client Services on an HP CIFS Server
- Configuring the LDAP-UX Client Services
- Enabling Secure Sockets Layer (SSL)
- Extending the Samba subschema into your Directory Server
- Migrating your data to the Directory Server
- Configuring the HP CIFS Server
- Creating Samba users in directory
- Management tools
- 7 Winbind support
- 8 Kerberos support
- 9 HP CIFS deployment models
- Introduction
- Samba Domain Model
- Windows Domain Model
- Unified Domain Model
- 10 Securing HP CIFS Server
- 11 Configuring HA HP CIFS
- 12 HP-UX configuration for HP CIFS
- 13 Tool reference
- Glossary
- Index

workgroup = MYREALM
realm = MYREALM.HP.COM
netbios name = atcux5
server string = Samba
Serveraces = 15.43.214.58 bind
interfaces only = Yes
security = ADS
password server = HPATCWIN2K4.MYREALM.HP.COM
kerberos method = dedicated keytab
dedicated keytab file = /etc/krb5.keytab
3. Run the following net ads commands to generate the keytab file:
• net ads keytab create -U administrator
• net ads keytab add cifs –U administrator
NOTE: If you have problems with authenticating earlier versions of clients, then you must
add HOST spn to the keytab file. Run the following command:
net ads keytab add HOST –U administrator
4. Validate your configuration by starting the HP CIFS Server, logging on to the domain with
clients, and mounting an HP CIFS share.
The HP CIFS Server can authorize the Windows client to access the server share using Kerberos
in the Windows domain and the keytab file on the HP CIFS Server. The keytab file generated
from HP CIFS Server can be used by HP-UX Internet Services also.
HP-UX Kerberos application co-existence 113