
HP CIFS Server 3.0k Administrator's Guide version A.02.04
Summary of Installing and Configuring
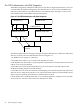
The following summarizes the steps you take when installing, configuring, verifying and activating
the HP CIFS Server with the LDAP support:
• Install Directory Server, if not already installed. See “Installing the Directory Server”.
• Configure Directory Server, if not already configured. See “Configuring Your Directory
Server”.
• Install the LDAP-UX Client Services on an HP CIFS Server, if not already installed. See
“Installing LDAP-UX Client Services on an HP CIFS Server”.
• Configure the LDAP-UX Client Services on an HP CIFS Server, if not already configured.
See “Configuring the LDAP-UX Client Services”.
• Enable Secure Sockets Layer (SSL) if you want to use it. See “Enabling Secure Sockets Layer
(SSL)”.
• Extend the Samba subschema to the Netscape Directory Server, See “Extending the Samba
Subschema into Your Directory Server”.
• Migrate your data to your Directory Server. See “Migrating Your data to the Directory
Server”.
• Configure the HP CIFS Server to enable LDAP support. See “Configuring the HP CIFS
Server”
• Install your Samba Users to Directory Server. See “Creating Samba Users in the Directory”.
Read subsequent sections of this chapter for more information on installing and configuring the
HP CIFS Server with the LDAP support.
Summary of Installing and Configuring 89