
HP CIFS Server 3.0i Administrator's Guide version A.02.03.03

1. Enter the DN of the directory user. The default value is displayed. To use the default,
press the Enter key; otherwise, enter you DN name.
2. Enter the password.
7. If you are creating a new profile, add all parent entries of the profile DN to the directory (if
any). If you attempt to create a new profile and any parent entries of the profile do not
already exist in the directory, setup will fail. For example, if your profile will be
cn=ldapuxprofile, dc=org, dc=hp, dc=com, then the base path, org.hp.com,must
exist in the directory or setup will fail.
8. Next enter either the DN of a new profile, or the DN of an existing profile you want to use.
If you are using an existing profile, setup configures your client, downloads the profile,
and exits. In this case, continue with step 11 below.
9. If you are creating a new profile, enter the directory manager DN and password of the
directory user who can create a new profile.
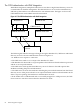
10. Next enter the host name and port number of the directory where you want to store your
name service data. For high availability, each LDAP-UX client can look for name service
data in up to three different directory hosts. You can enter up to three hosts, to be searched
in order.
11. Enter the base DN where clients should search for user name service data like passwd,
group, hosts, services, etc.
12. You can quickly configure a directory server and the first client by accepting the remaining
default configuration parameters when prompted.
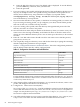
Table 6-1 “Configuration Parameters and Default Values” shows the configuration parameters
and the default values that they will be configured with.
Table 6-1 Configuration Parameters and Default Values
Default ValueParameter
AnonymousType of client binding
5 secondsBind time limit
no limitSearch time limit
YesUse of referrals
0 - infiniteProfile TTL (Time To Live)
YesUse standard RFC-2307 object class attributes for supported services
YesUse default search descriptions for supported services
SimpleAuthentication method
For the detailed configuration parameters information listed in the table 6-1, see "Appendix
B: LDAP-UX Client Services Object Classes" of LDAP-UX Client Services B.03.20 Administrator's
Guide at http://www.docs.hp.com.
13. After entering all the configuration information, setup extends the schema, creates a new
profile, and configures the client to use the directory.
14. Configure the Name Service Switch (NSS).
Save a copy of the /etc/nsswitch.conf file and edit the original to specify the ldap name
service and other name services you want to use. See the /etc/nsswitch.ldap file for a
sample. You may be able to just copy /etc/nsswitch.ldap to /etc/nsswitch.conf.
See nsswitch.conf(4) for more information.
15. You will be asked whether or not you want to start the client daemon, /opt/ldapux/bin/
ldapclientd. You must start the client daemon for LDAP functions to work.
88 LDAP Integration Support