
HP CIFS Server 3.0g Administrator's Guide verison A.02.03.01

lmPassword: E0AFF63989B8FA6576549A685C6ADFC1
ntPassword: E0AFF63989B8FA6576549A685C6ADFC1
acctFlags: [W ]
displayName: client1$
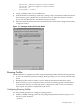
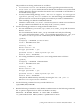
4. Logon to Windows NT as a local admin user.
5. From the Windows NT desktop, click 'Start', 'Settings' and 'Control Panel'. When the Control
Panel window opens, double-click on the 'Network' icon. When the 'Network' window
opens, click the 'Identification' tab. Refer to Figure 4-1 below.
6. Enter the Samba domain name in the 'Domain' field, and click on the 'Change' button. Refer
to Figure 4-3 below.
Figure 4-1 Entering A Samba PDC Domain Name
Roaming Profiles
The HP CIFS Server, configured as a PDC, supports Roaming Profiles with the following features:
• A user's environment, preference settings, desktop settings, etc. are stored on the HP CIFS
Server
• Roaming Profiles can be created as a share, and be shared between Windows clients
• When a user logs on to a workstation in the domain, the roaming profile is downloaded
from the share which is on a HP CIFS Server configured as a PDC, to the local machine.
Upon logout, the profile is copied back to the server
Configuring Roaming Profiles
Use the following procedure to configure roaming profiles:
1. Modify or enable roaming profiles by using the global parameter named logon path, in
the smb.conf file. Example:
[global]
Roaming Profiles 71