
HP CIFS Server 3.0f Administrator's Guide verison A.02.03


[lj1005]
path = /tmp
printable = yes
2. Create a [print$] share in the smb.conf file and set the path parameter to a directory named
/etc/opt/samba/printers. See the following example:
[print$]
path = /etc/opt/samba/printers
use client driver = no
browseable = yes
guest ok = yes
read only = yes
write list = netadmin
In the above example, the write list parameter specifies that administrative level user account has
write access for updating files on this share. The use client driver parameter must be set toNo.
3. Configure the printer admin parameter to specify a list of domain users that are allowed to connect
to an HP CIFS Server. See the following example:
[global]
printer admin = cifsuser1,cifsuser2
4. If the HP CIFS Server is not yet a member of the ADS domain, then run the net ads join -U
Administrator%password command to join an HP CIFS Server to the ADS domain as a domain
member server. See section "Join an HP CIFS Server to a Windows 2000/2003 Domain as an ADS
Member Server" in Chapter 5 “Windows 2000/2003 Domains” for details.
Publishing Printers from a Windows Client
Use the following procedures to publish printers from a windows client which is a domain member of the
ADS domain:
1. Log in to your window client as a user who is a member of the printer admin list. For example, the user's
name is cifsuser1.
2. Click on start.
3. Click on the run tab.
4. Type \\<HP CIFS Server name> in the open box to connect to an HP CIFS Server. For example,
type \\hpserverA. hpserverA is the name of an HP CIFS Server.
5. Click on the printers folder.
6. Double click on a printer and select printer, then the properties tab.
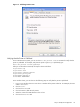
7. Click on sharing tab in the properties windows screen.
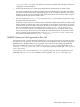
8. Check the list in the directory check-box in the sharing windows screen. See the following
screen snapshot for an example:
32 Installing and Configuring the HP CIFS Server