HP CIFS Client A.02.02 Administrator’s Guide HP-UX 11i v1 and v2 Manufacturing Part Number : B8724-90079 April, 2006 U.S.A. © Copyright 2006 Hewlett-Packard Company, L.P.
Legal Notices The information in this document is subject to change without notice. Hewlett-Packard makes no warranty of any kind with regard to this manual, including, but not limited to, the implied warranties of merchantability and fitness for a particular purpose. Hewlett-Packard shall not be held liable for errors contained herein or direct, indirect, special, incidental or consequential damages in connection with the furnishing, performance, or use of this material.
Contents 1. Introduction to the HP CIFS Client Introduction to HP CIFS . . . . . . . . . . . . . . . . . . . . . . . . . . . . . . . . . . . . . . . . . . . . . . . . . What is the CIFS Protocol? . . . . . . . . . . . . . . . . . . . . . . . . . . . . . . . . . . . . . . . . . . . . . HP CIFS Client Description . . . . . . . . . . . . . . . . . . . . . . . . . . . . . . . . . . . . . . . . . . . . . . HP CIFS Client Features. . . . . . . . . . . . . . . . . . . . . . . . . . . . . . . . . . . . . . . . . .
Contents Configuration Settings For Authentication . . . . . . . . . . . . . . . . . . . . . . . . . . . . . . . . . User Login Procedures. . . . . . . . . . . . . . . . . . . . . . . . . . . . . . . . . . . . . . . . . . . . . . . . . . . Introduction To Kerberos. . . . . . . . . . . . . . . . . . . . . . . . . . . . . . . . . . . . . . . . . . . . . . . . . Requirements and Limitations Using Kerberos . . . . . . . . . . . . . . . . . . . . . . . . . . . . . Using Kerberos with the HP CIFS Client . . . . .
Contents Description . . . . . . . . . . . . . . . . . . . . . . . . . . . . . . . . . . . . . . . . . . . . . . . . . . . . . . . . . . Options . . . . . . . . . . . . . . . . . . . . . . . . . . . . . . . . . . . . . . . . . . . . . . . . . . . . . . . . . . . . . Examples . . . . . . . . . . . . . . . . . . . . . . . . . . . . . . . . . . . . . . . . . . . . . . . . . . . . . . . . . . . . Files . . . . . . . . . . . . . . . . . . . . . . . . . . . . . . . . . . . . . . . . . . . . . . . . . . . . . . .
Contents 6. Troubleshooting and Error Messages Troubleshooting FAQs . . . . . . . . . . . . . . . . . . . . . . . . . . . . . . . . . . . . . . . . . . . . . . . . . . . How to Shutdown the Daemon with cifsclient stop . . . . . . . . . . . . . . . . . . . . . . . . . . What to Do if the Daemon Terminates . . . . . . . . . . . . . . . . . . . . . . . . . . . . . . . . . . . . Troubleshooting Kerberos in the HP CIFS Client . . . . . . . . . . . . . . . . . . . . . . . . . . . . .
Preface: About This Document The latest version of this document can be found on line at: http://www.docs.hp.com This document describes how to install, configure, and troubleshoot HP CIFS Client on HP-UX platforms. The document printing date and part number indicate the document’s current edition. The printing date will change when a new edition is printed. Minor changes may be made at reprint without changing the printing date. The document part number will change when extensive changes are made.
Publishing History Table 1 Publishing History Details Document Manufacturing Part Number Operating Systems Supported Supported Product Versions Publication Date B8724-90079 11i v1 and v2 A.02.02 April 2006 B8724-90067 11i v1 and v2 A.02.01 April 2005 B8724-90044 11.0, 11i v1 and v2 A.01.09 August 2003 B8724-90022 IA 11.22 A.01.08 June 2002 B8724-90011 11.0, 11i v1 and v2 A.01.
Chapter 4 Updating HP CIFS Client A.01.* to A.02.* Use this chapter to describe configuration parameter and command option differences between HP CIFS Client A.01.* and A.02.*. This chapter also provides the update procedures so that you can plan and upgrade your CIFS Client. Chapter 5 Commandline Utilities Use this chapter to learn about UNIX man pages for all HP CIFS Client utilities.
1 Introduction to the HP CIFS Client This chapter provides a HP CIFS Client description.
Introduction to the HP CIFS Client It contains the following sections: 12 • Introduction to HP CIFS. • HP CIFS Client Description. • HP CIFS Client Features.
Introduction to the HP CIFS Client Introduction to HP CIFS Introduction to HP CIFS HP CIFS provides HP-UX with a distributed file system based on the Microsoft Common Internet File System (CIFS) protocols. HP CIFS implements both the server and client components of the CIFS protocol on HP-UX.
Introduction to the HP CIFS Client Introduction to HP CIFS PAM NTLM The HP-UX PAM subsystem gives system administrators the flexibility of choosing any authentication service available on the system to perform authentication. The framework also allows new authentication service modules to be plugged in and made available without modifying the applications. The PAM framework, libpam, consists of an interface library and multiple authentication service modules.
Introduction to the HP CIFS Client HP CIFS Client Description HP CIFS Client Description HP CIFS Client implements the CIFS protocols on HP-UX so that HP-UX users may mount shares from CIFS servers as UNIX file systems.
Introduction to the HP CIFS Client HP CIFS Client Features HP CIFS Client Features Following is a list of the HP CIFS Client major features: • CIFS UNIX Extensions • NTLM PAM Integration • Kerberos Authentication, Integration with System Kerberos Cache • ONC AutoFS 2.
Introduction to the HP CIFS Client HP CIFS Client Features NTLM PAM Integration NT LAN Manager (NTLM) is the default protocol by which CIFS clients are authenticated by CIFS servers. When used in conjunction with HP's NTLM Pluggable Authentication Module (PAM) and the HP CIFS Client, users who log in to an HP-UX system will have access automatically to CIFS-mounted file systems provided that PAM NTLM and the CIFS server are using the same database.
Introduction to the HP CIFS Client HP CIFS Client Features In order to provide HP CIFS Client AutoFS support, AutoFS 2.3 must be installed and configured on the system. For detailed information on installing and configuring AutoFS, please refer to “Configuring and Administering AutoFS” in NFS Services Administrator’s Guide on HP-UX at http://www.docs.hp.com. NOTE Automounting a CIFS filesystem using the HP ONC+ AutoFS service is only supported on HP-UX release 11i v1 and v2.
Introduction to the HP CIFS Client HP CIFS Client Features In the CIFS protocol, packet signing is negotiated when the client makes its initial connection to the server. Starting with the first user login to the server, all SMB packets between the client and server must be signed. See “Packet Signing” on page 53 for a description of the smbPacketSigning configuration parameter. NetBIOS Name Services, WINS, and DNS HP CIFS Client A.02.
Introduction to the HP CIFS Client HP CIFS Client Features For information on how to set up DFS on a CIFS server, consult your CIFS server documentation. The following describe the major features of DFS: • High data availability Multiple copies of read-only shares can be mounted under the same logical DFS name to provide alternate locations for accessing data. If one of the copies becomes unavailable, an alternate is automatically selected.
Introduction to the HP CIFS Client HP CIFS Client Features The HP CIFS Client supports the following kernel module states: • Auto: The module will be dynamically loaded at the first time it is used. • Static: The module is statically linked into the kernel. • Loaded: The module is dynamically loaded and running in the kernel. • Unused: The module is not loaded in the kernel. • Best: A state that selects the following order of preference: auto, static, loaded, unused.
Introduction to the HP CIFS Client HP CIFS Client Features 22 Chapter 1
2 Installing, Configuring, and Using the HP CIFS Client This chapter describes the procedures for installing HP CIFS Client software on your system.
Installing, Configuring, and Using the HP CIFS Client It contains the following sections: 24 • “Overview of HP CIFS Client Installation and Configuration” on page 25. • “Step 1: Checking HP CIFS Client Installation Prerequisites” on page 26. • “Step 2: Installing HP CIFS Client and PAM Software” on page 27. • “Step 3: Configuring the HP CIFS Client” on page 28. • “Step 4: Starting and Stopping the HP CIFS Client Daemon” on page 30. • “Using the HP CIFS Client” on page 31.
Installing, Configuring, and Using the HP CIFS Client Overview of HP CIFS Client Installation and Configuration Overview of HP CIFS Client Installation and Configuration Installation of the HP CIFS Client includes checking installation prerequisites, loading the HP CIFS Client filesets using the swinstall(1M) utility, and completing HP CIFS configuration procedures. The CIFS Client and PAM NTLM products are delivered in the same bundle, packaged for installation via HP Software Distributor (SD).
Installing, Configuring, and Using the HP CIFS Client Step 1: Checking HP CIFS Client Installation Prerequisites Step 1: Checking HP CIFS Client Installation Prerequisites Prior to loading the HP CIFS Client software onto your system, check that you have met the following hardware and software prerequisites: 1. The HP CIFS client runs on all HP workstations and Servers that are capable of running HP-UX version 11.11 or later, in either 32-bit or 64-bit mode.
Installing, Configuring, and Using the HP CIFS Client Step 2: Installing HP CIFS Client and PAM Software Step 2: Installing HP CIFS Client and PAM Software You must have root privileges to install software on your HP-UX system. Because the CIFS Client contains a kernel module, the installation reboots the system upon completion. Installing From CD If you are installing HP CIFS Client and PAM software from CD, run swinstall, and select HP CIFS Client or PAM NTLM (or both) from the CD ROM depot path.
Installing, Configuring, and Using the HP CIFS Client Step 3: Configuring the HP CIFS Client Step 3: Configuring the HP CIFS Client The configuration file for the HP CIFS Client, /etc/opt/cifsclient/cifsclient.cfg, can be used as delivered, with no modification of its default values. Editing cifsclient.cfg The file /etc/opt/cifsclient/cifsclient.cfg.default contains factory default settings. The user is urged not to modify this file but to save it as a reference.
Installing, Configuring, and Using the HP CIFS Client Step 3: Configuring the HP CIFS Client If, for example, your CIFS Client is configured as a Japanese system using the Shift-JIS locale, and it is connected to a Japanese CIFS Server that also uses Shift-JIS, you would configure the following: serverCharMapFile = "/etc/opt/cifsclient/unitables/unimapShiftJIS.cfg"; clientCharMapFile = "/etc/opt/cifsclient/unitables/unimapShiftJIS.cfg"; 3.
Installing, Configuring, and Using the HP CIFS Client Step 4: Starting and Stopping the HP CIFS Client Daemon Step 4: Starting and Stopping the HP CIFS Client Daemon Use the cifsclient command to start and stop the HP CIFS client. The syntax is: cifsclient {start|stop} cifsclient with no argument is equivalent to cifsclient start. If the HP CIFS client is already running when you execute the command, you will get a message indicating it is already up.
Installing, Configuring, and Using the HP CIFS Client Using the HP CIFS Client Using the HP CIFS Client This section presents summary of how the HP CIFS Client can be used. The basic procedure is (1) start the daemon, (2) mount shared directories, (3) log in to CIFS Servers. Following are examples of these steps and some additional useful tips: 1. Start the daemon.
Installing, Configuring, and Using the HP CIFS Client Using the HP CIFS Client To mount: $ mount -F cifs buildsys:/source /home/devl/source To unmount, specify only the mout point: $ umount /home/devl/source 3. Access the shared directory via the mount point on the Client. The CIFS protocol allows access to mounted directories only to users who have been authenticated by the server or a domain controller. This is accomplished through the cifslogin command.
Installing, Configuring, and Using the HP CIFS Client Using the HP CIFS Client This succeeds. you can use cifslist command to verify the results. The cifslist command without any option displays servers with shares and mountpoints information, it uses the \\server\share format for mounted objects.
Installing, Configuring, and Using the HP CIFS Client Using the HP CIFS Client $ cifslist Mounted Object Mountpoint State ------------------------------------------------------------\\BUILDSYS\source /home/devl/source M ============================================================= Server Local User Remote User Domain State -------------------------------------------------------------buildsys joe joe L buildsys lucy lucy L Note that the Local User (the HP-UX account name) does not need to be the same as the
Installing, Configuring, and Using the HP CIFS Client Using the HP CIFS Client Mounting and Logging in in One Step The root user has the option to mount a CIFS filesystem and log in to the CIFS Server in one step, eliminating the need to explicitly issue the cifslogin command. Using the names from the examples above: $ mount -F cifs -o username=x,password=y buildsys:/source /home/dev1/source where x and y are the name and password pair recognized by the server.
Installing, Configuring, and Using the HP CIFS Client Automatic Mounting of CIFS Filesystems Automatic Mounting of CIFS Filesystems In addition to the mount command discussed in the previous section, which was used to explicitly create a single mount, there are other methods to manage the mounting of CIFS file systems. See the reference for mount_cifs and umount_cifs in Chapter 6 for syntax details not contained in this section.
Installing, Configuring, and Using the HP CIFS Client Name Resolution: NetBIOS Name Service, WINS, DNS, IP Configuration Name Resolution: NetBIOS Name Service, WINS, DNS, IP Configuration When the CIFS Client attempts to mount a CIFS server, it must first establish a NetBIOS connection to the server, hence the server specified in the mount or cifsmount command must be the CIFS server’s NetBIOS (Windows) name.
Installing, Configuring, and Using the HP CIFS Client Name Resolution: NetBIOS Name Service, WINS, DNS, IP Configuration • If the server’s NetBIOS name differs from its DNS name (DNS cannot resolve it), and it is on a different subnet from the CIFS Client (NetBIOS broadcast cannot resolve it), and its address is not resolved by WINS, then you need to create a server entry for the IP address in the CIFS Client configuration file.
Installing, Configuring, and Using the HP CIFS Client HP CIFS Client Files and Directories HP CIFS Client Files and Directories This section lists the important files that comprise the HP CIFS Client. Table 2-1 HP CIFS Client Files and Directories File/Directory Chapter 2 Description /opt/cifsclient/ Base directory for all CIFS Client core files and administrative files. /opt/cifsclient/bin/ CIFS Binaries. cifsmount Mounts CIFS Shares from CIFS Servers. Can only be used by root user.
Installing, Configuring, and Using the HP CIFS Client HP CIFS Client Files and Directories Table 2-1 HP CIFS Client Files and Directories (Continued) File/Directory 40 Description cifsdb adds, modifies and deletes entries in CIFS Client databases. The entries allow CIFS mounts and logins to be performed automatically. /opt/cifsclient/pam HP CIFS PAM files. /opt/cifsclient/sbin CIFS Clients for use by the administrator or root user. The CIFS Client daemon is contained in this directory.
3 CIFS Security and Authentication This chapter provides a description for CIFS Security and Authentication Methods using Windows NT LanManager (NTLM), Chapter 3 41
CIFS Security and Authentication NTLMv2 and Kerberos. It contains the following sections: 42 • “Introduction” on page 43. • “User Login Procedures” on page 45. • “Introduction To Kerberos” on page 47. • “Using Kerberos with the HP CIFS Client” on page 48. • “CIFS Client Kerberos Authentication Policies” on page 52. • “Packet Signing” on page 53.
CIFS Security and Authentication Introduction Introduction One of the important characteristics of the CIFS file-sharing protocol is its security model. Before a user on a CIFS client can access the mountpoint of a CIFS server, the user must be authenticated by the server (the user must login to the server). Four login methods are available; they are explained in the following pages. Restrictions at the file or directory level on the server’s filesystem are also enforced by the server.
CIFS Security and Authentication Introduction Server-Specific configuration section below. These parameters are used to select which mechanisms are used by the CIFS Client to authenticate users to CIFS servers. Legal entries for the authenticationMethod parameter are ntlm or kerberos.The default value of this parameter is ntlm.
CIFS Security and Authentication User Login Procedures User Login Procedures • Explicit Login (cifslogin) Users on the CIFS Client can authenticate themselves to CIFS servers explicitly with the cifslogin command. Please see the cifslogin man page in Commandline Utilities Chapter. • Automatic Login The CIFS Client provides methods for accessing mounted CIFS file servers automatically. The initial request for access to a CIFS mountpoint (cd, ls, etc.
CIFS Security and Authentication User Login Procedures perform a manual login in order to store the encrypted passsword. You can use the cifslogin -s or cifsdb command to save an entry in the user database or use the cifsdb -d command to delete an entry from the user database. Please see man pages cifslogin, cifsdb in Chapter 5, “Commandline Utilities,” on page 69 for details. NOTE Automatic login using user database is not supported with Kerberos 4.
CIFS Security and Authentication Introduction To Kerberos Introduction To Kerberos Kerberos is a distributed authentication service that allows a process (a client) running on behalf of a principal (a user) to prove its identity to a verifier (an application server, or only a server) without sending data across the network that might allow an attacker or the verifier to subsequently impersonate the principal.
CIFS Security and Authentication Using Kerberos with the HP CIFS Client Using Kerberos with the HP CIFS Client These procedures should be followed to use Kerberos with the HP CIFS Client: Step 1. Review fundamental Kerberos operating principals Step 2. Set up and verify the Kerberos infrastructure Step 3. Configure Kerberos in the HP CIFS Client Step 1.
CIFS Security and Authentication Using Kerberos with the HP CIFS Client http://www.isi.edu/gost/publications/kerberos-neuman-tso.html • The documentation repository at Massachusetts Institute of Technology (the developer of Kerberos): http://web.mit.edu/kerberos • The Kerberos specification, RFC 1510. An excellent introduction (section 1) and descriptions of message exchanges (section 3): http://ftp.rfc-editor.org/in-notes/rfc1510.
CIFS Security and Authentication Using Kerberos with the HP CIFS Client The CIFS servers to which you want to connect via Kerberos with the CIFS client must be joined to the Windows Domain. For more information, refer to Windows online help or the HP CIFS Server Administrator’s Guide. For information on setting up user accounts on a Windows KDC, consult online help for managing user Domain accounts. To set up the HP-UX Kerberos client, consult the Configuration Guide cited above in step 1.
CIFS Security and Authentication Using Kerberos with the HP CIFS Client Step 3. Configure Kerberos on the HP CIFS Client Set the configuration parameter authenticationMethod to kerberos. The configuration setting is: authenticationMethod = kerberos; Ensure there are no active CIFS mounts or logins at the server, and then login as illustrated in “User Login Procedures” on page 45.
CIFS Security and Authentication CIFS Client Kerberos Authentication Policies CIFS Client Kerberos Authentication Policies This section assumes that the CIFS server and client have negotiated the use of Kerberos. Explicit login: cifslogin Kerberos authentication is implemented transparently in this command. Required Kerberos credentials (TGT and ST) are acquired from the KDC on behalf of the user and the Service Ticket (ST) is sent to the CIFS server within a SESSION_SETUP request.
CIFS Security and Authentication Packet Signing Packet Signing The purpose of the CIFS packet signatures is prevention of man-in-the middle attacks: the client and server are mutually assured of the other’s identity by requiring an unique signature on each SMB packet.
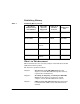
CIFS Security and Authentication Packet Signing Table 3-1 Configuration Options For smbPacketSigning Valid Option 54 Description enabled HP CIFS Client connects with the CIFS server and signs packets if the server supports signing. HP CIFS Client connects with the CIFS server, but does not sign packets if the CIFS server does not support signing. required The CIFS server must support signing.
4 Migrating From HP CIFS Client A.01 to A.02 HP CIFS Client A.02.* provides new features and requires only minimal configuration changes to update in most cases.
Migrating From HP CIFS Client A.01 to A.02 there are some configuration parameter and command option differences between HP CIFS Client A.01.* versions and HP CIFS Client A.02.* versions. This chapter describes these differences and provides update procedures so that you can plan and upgrade your CIFS Client. This chapter contains the following sections: 56 • “Migrating from version A.01.* to A.02.* of HP CIFS Client” on page 57. • “Funtionality Differences Between HP CIFS Client A.01.* and A.02.
Migrating From HP CIFS Client A.01 to A.02 Migrating from version A.01.* to A.02.* of HP CIFS Client Migrating from version A.01.* to A.02.* of HP CIFS Client Special Instructions For Users of HP CIFS Client Versions A.01.* NOTE These migration procedures are recommended for users who: • may want to revert to an A.01.
Migrating From HP CIFS Client A.01 to A.02 Migrating from version A.01.* to A.02.* of HP CIFS Client Step 2. Save configuration file to the backup directory. If you do not use a modified version of the configuration file, you may skip this step. $ cp /etc/opt/cifsclient/cifsclient.cfg A.01_migration_files/A.01.cfg Step 3. Use the cifslist -U command to generate an ascii listing of saved user records in database and to save it to the backup directory.
Migrating From HP CIFS Client A.01 to A.02 Migrating from version A.01.* to A.02.* of HP CIFS Client Step 1. Remove version A.02 (a system reboot will occur after the removal is completed): $ swremove -x autoreboot=true -x mount_all_filesystems=false B8724AA Step 2. Download the most recent release of version A.01 of the CIFS Client from http://software.hp.com. Step 3. Install the downloaded CIFS Client depot.
Migrating From HP CIFS Client A.01 to A.02 Funtionality Differences Between HP CIFS Client A.01.* and A.02.* Funtionality Differences Between HP CIFS Client A.01.* and A.02.* The following describes functionality differences between HP CIFS Client A.01.* and A.02.*: • In HP CIFS Sever A.02.01, unmounting the last mount to a server does not logout any of the users logged in at the server. The HP CIFS Client A.01.x or earlier versions log out the users when the last share is unmounted.
Migrating From HP CIFS Client A.01 to A.02 Configuration Differences Between HP CIFS Client A.01.* and A.02.* Configuration Differences Between HP CIFS Client A.01.* and A.02.* Comments in Configuration File In HP CIFS Client A.01.*, multiple comment tags were recognized. In HP CIFS Client A.02.*, the # character starts a comment; any text between a # character and the end of a line is a comment.
Migrating From HP CIFS Client A.01 to A.02 Configuration Differences Between HP CIFS Client A.01.* and A.02.* Removed Configuration Parameters The following is a list of A.01.* configuration parameters which are no longer used in the HP CIFS Client A.02.*: • runAsUser • databaseFile • mtabName • maxOpenFiles Parameter Name Changes Table 4-1 shows a list of A.01.* configuration parameters which have been renamed in the HP CIFS Client A.02.*: Table 4-1 Parameter Name Changes A.01.* A.02.
Migrating From HP CIFS Client A.01 to A.02 Configuration Differences Between HP CIFS Client A.01.* and A.02.* The following is a list of new configuration parameters for the Global section in HP CIFS Client A.02.*: • corefileLimit • networkInterfaces • bindUdpExplicitly • pagePoolInitialSize The following is a list of new configuration parameters for the nfs3 specific basis in HP CIFS Client A.02.
Migrating From HP CIFS Client A.01 to A.02 Configuration Differences Between HP CIFS Client A.01.* and A.02.
Migrating From HP CIFS Client A.01 to A.02 Command Option Differences Between HP CIFS Client A.01.* and A.02.* Command Option Differences Between HP CIFS Client A.01.* and A.02.* This section describes command option differences between HP CIFS Client A.01.* and A.02.* shown in the following tables. These tables do not show command options that have not changed between versions A.01.* and A.02.*. For detailed information on the commands, see Chapter 5, “Commandline Utilities,” on page 69.
Migrating From HP CIFS Client A.01 to A.02 Command Option Differences Between HP CIFS Client A.01.* and A.02.* Table 4-3 shows a list of mount -F cifs command option differences between A.01.* and A.02.*. Table 4-3 mount_cifs A.01.* A.02.* comments -o nbname= Moved to configuration file in A.02.* -o port= Moved to configuration file in A.02.* -o domain= New option in A.02.* Removed in HP CIFS Client A.02.
Migrating From HP CIFS Client A.01 to A.02 Command Option Differences Between HP CIFS Client A.01.* and A.02.* Table 4-5 shows a list of cifslogin command option differences between A.01.* and A.02.*. Table 4-5 cifslogin A.01.* Username given in the command line A.02.* comments -U username Can specify the username with or without -U option in A.02.*. -D domain New parameter in A.02.*, overrides the configured value. Table 4-6 shows a new cifsdb command implemented in A.02.*. Table 4-6 cifsdb A.01.
Migrating From HP CIFS Client A.01 to A.02 Command Option Differences Between HP CIFS Client A.01.* and A.02.
5 Commandline Utilities This chapter provides details for the CIFS Client Commandline Utilities.
Commandline Utilities cifsclient Stop and start the CIFS client. cifsmount Mount a directory from a remote server. cifslogin Authenticates a user to the remote server. cifsumount Disconnect a local mountpoint from the server, if it is not mounted elsewhere. cifslogout Disconnect a user login session and disconnect the server shares from the specified server. After logging out, the user cannot access any files from that server. cifslist Lists connected servers, mountpoints, mounted shares, etc.
Commandline Utilities cifsclient cifsclient Synopsis cifsclient {command} cifsclient fuser [-v] mountpoint [...] cifsclient force_umount {mountpoint [...]| -a} Description This shell script is used to start and stop the HP CIFS Client, and perform other useful tasks. Only users with root capabilities can invoke start, stop, restart, fuser, and force_umount (see also the -a option to klist and kdestroy). Any user can invoke status, klist, kdestroy, and ver.
Commandline Utilities cifsclient directly, specifying the -c {filename} option. CIFS Client Kerberos credentials files are located in /var/opt/cifsclient/krb5_tmp. These files will be present on the system only if the configuration parameter, rmTmpKerbCredFiles, has been set to no. -a (recognized only for root) destroys all files for all users. ver [-v] Report version information. The following modifiers are also recognized: -v Verbose: display what(1) strings for binaries, scripts and configuration files.
Commandline Utilities cifsclient This file contains run-time configuration options for the HP CIFS Client. For detailed information see Chapter 7. /var/opt/cifsclient/krb5_tmp/krb5cc__ Temporary CIFS Client Kerberos credentials file. is the name of the CIFS server to which the user has been authenticated, is the decimal UID of the user.
Commandline Utilities cifsmount cifsmount You can use the mount command to execute the cifsmount command. See “mount_cifs, umount_cifs” on page 87 for the usage of the mount command. This section describes the usage of the cifsmount command. Synopsis cifsmount [] /// Description The cifsmount command is used to mount remote shares on the local file system. It mounts the share from server in the local file system at .
Commandline Utilities cifsmount the possibility to pass a dynamically generated password to the server. The password is ignored if the user is already logged in at the server. Chapter 5 -S Reads the password from stdin. This option may be useful if you want to use cifsmount from a shell script or another program. The -P option is insecure for this purpose because the UNIX command ps can show the commandline parameters of running processes. -N Do not prompt for a password.
Commandline Utilities cifsmount This option may be useful for automounting and to run programs by cron that cannot ask the user for a password. Passwords are stored in the HP CIFS Client's user database file. It is possible to get the HP CIFS hash values of the passwords (which is functionally equivalent to the passwords themselves) out of this file, although the file itself is not sufficient.
Commandline Utilities cifslogin cifslogin Synopsis cifslogin [] [] cifslogin [] /// Description The cifslogin command is used to authenticate additional users at a server. Only authenticated users may access mounted files. Each user accesses the file at the server with his or her privilege status at that server.
Commandline Utilities cifslogin -N Do not prompt for a password. This option may be used to avoid prompting for a password if you are already logged in at the server or if the user does not have a password. -u Enables plain text passwords. The HP CIFS Client refuses to send passwords in plain text to the server by default because this is a security risk. There are tools available that sniff the network for plain text passwords. If you really must send the password in plain text (e.g.
Commandline Utilities cifslogin Examples If local user steve has mounted a share from server bigserver, local user bill has no access to the mounted files because he is not logged in at the server. Bill, who has an account on bigserver under his real name miller, can do the following to gain access: cifslogin bigserver -U miller Bill will be prompted for a password and if it is correct, he will be given access to the share with the same privileges that user miller has on bigserver.
Commandline Utilities cifsumount cifsumount You can use the umount command to execute the cifsumount command. Both commands are shown below. Synopsis cifsumount [] cifsumount -a Description The cifsumount command is used to unmount any shares mounted with cifsmount. Shares can only be unmounted by the user that mounted the share at the given mountpoint or the superuser. The second variant (with the -a option) unmounts all mounts that are currently served. In HP CIFS Sever A.02.
Commandline Utilities cifslogout cifslogout Synopsis cifslogout Description The cifslogout command is used to log the user who uses the command out of the server specified. After issuing cifslogout, the user cannot access any files from that server unless he or she is still stored in the user database.
Commandline Utilities cifslist cifslist Synopsis cifslist [] Description The cifslist command is used to view internal tables of HP CIFS Client. In HP CIFS Client A.02.*, the cifslist command without options will list all connected servers with shares and mountpoints information. Options -h Prints short help and exits. -u Lists users only. -m Lists mounts only. -x Displays mounted objects using UNIX style format: server:/share. -r Prints raw output format.
Commandline Utilities cifslist The sample output of the cifslist command is shown as follows: $ cifslist Mounted Object Mountpoint State ------------------------------------------------------------\\er721142\pub /mnt/cifs_linux/00 M \\er721141\pub /mnt/cifs_nt/00 M \\hpntc43\pub /mnt/cifs_nt/01 MS ============================================================= Server Local User Remote User Domain State -------------------------------------------------------------er721141 root cifsuser L er721142 root john L
Commandline Utilities cifslist hpntc43 root cifsuser WORKGROUP LS In the above exmaple, HP CIFS Client displays servers with shares and mountpoints information, it uses the UNIX format: server:/share for mounted objects.
Commandline Utilities cifsdb cifsdb Synopsis cifsdb [-d] {} Description The cifsdb command is used to add, modify and delete entries in CIFS Client databases. The entries allow CIFS mounts and logins to be performed automatically, as described below.
Commandline Utilities cifsdb For CIFS logins that have been authenticated with Kerberos, users’ NTLM password hashes are not saved in the CIFS Client user database. You can establish automatic CIFS logins with Kerberos through kinit(1) or PAM-KERBEROS, as described in the Chapter 3, “CIFS Security and Authentication,” on page 41. Options -d {} Delete the corresponding entry for this mount_point or server from the database.
Commandline Utilities mount_cifs, umount_cifs mount_cifs, umount_cifs Mounts and unmounts CIFS file systems. This section describes the usage of the mount and umount commands when the CIFS filesystem is specified for the FS type Synopsis mount -F cifs [-ar] [-o fs_specific_option[,...]] [server:/share mount_point] umount -aF cifs | mount_point Description The mount command mounts file systems. Only a superuser can mount file systems. Other users can use mount to list mounted file systems.
Commandline Utilities mount_cifs, umount_cifs -a Used with mount, mounts all CIFS filesystems that have entries in /etc/fstab. Used with umount, unmounts all currently mounted CIFS file systems. -r Mounts as read-only. -o This class of options is specified with the following syntax: -o keywrd[,keywrd...],keywrd=value[,keywrd=va lue...] Some keywords are specified as keyword/value pairs, some are not. -o options must be delimited by commas; no white space is allowed.
Commandline Utilities mount_cifs, umount_cifs ipaddr=ipaddress Use only this IP address to connect to the server. This setting causes the CIFS Client to bypass all name-resolution procedures for this mount request, and supersedes any corresponding entry configured in cifsclient.cfg. plaintxt Enable plain text passwords. The HP CIFS Client refuses to send passwords in plain text to the server by default because this is a security risk.
Commandline Utilities mount_cifs, umount_cifs 90 Chapter 5
6 Troubleshooting and Error Messages This chapter includes information about problems that you may encounter when using the HP CIFS client and explanations of error Chapter 6 91
Troubleshooting and Error Messages messages that might occur with HP CIFS commands. 92 • “Troubleshooting FAQs” on page 93. • “Troubleshooting Kerberos in the HP CIFS Client” on page 94. • “Troubleshooting cifsmount or mount in the HP CIFS Client” on page 96. • “CIFS Client Log File and Log Levels” on page 98.
Troubleshooting and Error Messages Troubleshooting FAQs Troubleshooting FAQs This section includes commonly asked questions about HP CIFS. How to Shutdown the Daemon with cifsclient stop You should never kill the daemon process directly. Although HP CIFS tries to unmount all mounted shares, it may not be successful and the stale mounts will become unusable and cause problems. The correct way to do it is with cifsclient stop.
Troubleshooting and Error Messages Troubleshooting Kerberos in the HP CIFS Client Troubleshooting Kerberos in the HP CIFS Client • cifsTrace, authentication log levels Informative log messages will be produced by Kerberos processing in the HP CIFS Client log file if the cifsTrace and authentication log levels are enabled. • Temporary credentials files When Kerberos authentication is used, the HP CIFS Client utilizes a temporary file to store users’ credentials during login processing.
Troubleshooting and Error Messages Troubleshooting Kerberos in the HP CIFS Client in the servers section. The servers section of the configuration file is discussed near the end of Chapter 7, and the configuration file itself contains a sample servers entry.
Troubleshooting and Error Messages Troubleshooting cifsmount or mount in the HP CIFS Client Troubleshooting cifsmount or mount in the HP CIFS Client This section includes information about problems that you may encounter when using the cifsmount or mount command to mount a share on a CIFS server and actions you may take to correct the problems.
Troubleshooting and Error Messages Troubleshooting cifsmount or mount in the HP CIFS Client After you verify that the CIFS Client DLKM state is unused, you can use the following command to change the CIFS Client DLKM state to auto, so the CIFS Client DLKM can be loaded. The command and output message display are shown as follows: $ kcmodule cifs=auto * The sutomatic ‘backup’ configuration has been updated. * The request changes have been applied to the currently * running system.
Troubleshooting and Error Messages CIFS Client Log File and Log Levels CIFS Client Log File and Log Levels The CIFS Client produces a log file of its activities, in the directory /var/opt/cifsclient/debug. Each time the client starts, it creates a new log file, named client-log.pid, where pid is the HP-UX process id of the CIFS Client daemon, cifsclientd. Normally, the log file records only errors or warnings.
7 Configuration File The default configuration file should work without modifications. Please be sure you understand the effects of any changes before you decide to modify the configuration file.
Configuration File The configuration file is parsed by the HP CIFS Client daemon at startup and when edited. Although it is re-read by the running daemon, not all configuration changes will work immediately. Most options are read into internal variables when they are used. The server configuration, for instance, is transferred into internal structures when a connection to the server is opened.
Configuration File General Structure General Structure Configuration files are built from the following simple syntactic structures: • comments • strings • arrays • dictionaries The # character starts a comment; any text between a # character and the end of a line is a comment. # comment to end of line Strings, arrays and dictionaries are classified by the generic term "property". Strings are sequences of alphanumeric characters, including the underscore.
Configuration File General Structure property3 = { firstWord = value; secondWord = of; thirdWord = property3; }; } The configuration file itself is a dictionary (the surrounding curly braces are optional because other properties are not allowed). The keys at the top level are the names of the configuration variables. Properties that have been parsed as strings may be interpreted in one of the following ways: • string • number • enumeration • boolean String needs no further explanation.
Configuration File Configuration Parameters Configuration Parameters The following is a list of all variables that may be configured for the top 3 basis sessions: main, nfs3, cifs. logLevels The value of this variable is an array enumerating all logging modes that are active, the number in the square bracket indicates the messages of the respective logging mode in the log file. A logging mode is a string out of the following set: [0]info Logging of informational messages. Should be turned on.
Configuration File Configuration Parameters Generates hex-dumps of all outgoing and incoming Netbios traffic. This is very useful during debugging but should be turned off for normal operation. [7] nfsTrace Provides detailed information about all NFS requests done by the kernel and the respective return values. It is very useful for debugging NFS but should be turned off for normal operation. [8] rare Logging of rare conditions. Used only during debugging. [9] cacheDebug Debugging of the cache's operation.
Configuration File Configuration Parameters Debugging of server connection and disconnection messages for NetBIOS. Useful only during debugging. [16] uiTrace Generates hex-dumps of the communication with user interface. This is useful during debugging but should be turned off for normal operation. [17] nbnsTrace Generates hex-dumps of all NetBIOS name service traffic. This is useful during debugging but should be turned off for normal operation. [18] diskarb Debugging of disk arbitration.
Configuration File Configuration Parameters # diskarb,# disk arbitration # authentication, ); The log file records only errors or warnings. But, many log levels can be enabled for checking activities of various modules within the CIFS Client. If you report a problem to HP, your support representative may ask you to enable one or more log levels.
Configuration File Configuration Parameters be given by name or as numeric id. Do not set these values to anything other than mode=0600 and owner=root unless you really know what you are doing. The file access modes of this UNIX domain socket are used to provide secure authentication of the user that requests a service to the daemon. If these variables are not configured from the file, they default to the correct values.
Configuration File Configuration Parameters (and vice versa). The default is a codepage 437 mapping, which is the US-Latin DOS character set. Mapping files for various character sets are distributed with HP CIFS Client in the directory unitables. clientCharMapFile This variable configures the path to the character mapping file for the client. This file defines the mapping from internal Unicode representation to the ASCII strings seen at the client.
Configuration File Configuration Parameters If this variable is set to yes, HP CIFS Client binds UDP ports to all networks explicitly. Otherwise, it binds to address 0.0.0.0, a wildcard for all network interfaces installed. Binding explicitly may be required on operating systems which do not handle the source IP address of broadcasts correctly if there are multiple network interfaces.
Configuration File Configuration Parameters nfs3 This section defines a default behavior which can be overridden by specific configurations. The NFS3 section contains the following parameters: cacheFiles This variable defines the number of files cached by NFS handle. The default is 500. cacheOpenFiles This variable defines the number of files that can be kept open even if they are not currently accessed. The default is 20.
Configuration File Configuration Parameters nfsKernelCacheTime NFS kernel is cached for this amount of time (in seconds). A variable that can enable kernel caching by NFS. This improves performance of certain types of operations by reducing the number of calls sent over the network. The deault setting is 0 second. lookupStrategy As you probably know, the HP CIFS Client maps between NFS requests and SMB/CIFS requests. On the NFS side, files are referenced by unique identifiers, called NFS file handles.
Configuration File Configuration Parameters nfsTimeout This integer variable defines the initial timeout in 1/10 seconds that is used by the kernel when it requests data from HP CIFS Client. This value is doubled on each retry. Together with nfsRetransmit, this defines the absolute timeout for NFS requests. A value of 50 (5 seconds) avoids frequent retries of already running (slow) requests and ensures a total timeout of about 2 minutes. This should be sufficient even for the slowest devices and links.
Configuration File Configuration Parameters preferredPort Chapter 7 This integer variable defines the port number that HP CIFS Client attempts to use for NFS. If this port is not available, the HP CIFS Client chooses a free one. It is good to have a constant port for NFS because it allows a restarted daemon to take over the mounts of a previous incarnation. The port number must be below 1024 if not all local users are trusted.
Configuration File Configuration Parameters cifs The structure of CIFS has its mirror in the multitude of options for CIFS configurations. This section defines a default behavior which can be overridden by specific configurations. The CIFS section contains the following parameters: dataCacheSize This integer variable defines the number of bytes spent for per data cache. The value of this variable should be a multiple of 8k. databaseFile This variable configures the path to the user database file.
Configuration File Configuration Parameters This boolean variable configures whether NetBIOS broadcast is enabled. WINS is feature of the NetBIOS name server. To enable WINS lookup, you must set this variable to yes and specify the nbnsWinsIp variable with the IP address of the WINS server. The CIFS servers to which you want to connect must be registered with the WINS server. By default, this parameter is set to yes. lookupTryDns This variable configures whether Domain Name Server (DNS) lookup is enabled.
Configuration File Configuration Parameters /local_mountpoint/dir_at_top_level_of_share/ subdir/file nbnsWinsIp This string variable defines the IP address of the WINS server. If there is no WINS server in your network, set this variable to an empty string. nbnsInitialTimeout, nbnsTotalTimeout The nbnsInitialTimeout variable defines the initial timeout in milliseconds that is used by the NetBIOS name service operations. This value is doubled on each retry.
Configuration File Configuration Parameters compatible with later CIFS Client binaries. In order for CIFS Client A.02.
Configuration File Configuration Parameters cifs.server.”.default” The baroque structure of CIFS has its mirror in the multitude of configuration options for CIFS connections. This variable defines a default behavior which can be overridden by specific configurations for each server. The value is a dictionary with the following parameters: localNetbiosName This entry can be used to set the Netbios name for the client that is sent to the server.
Configuration File Configuration Parameters is used for logins to the server. If the value is set to ntlmv2,then NTLMv2 is used. The default setting is ntlm. smbPacketSigning This string variable specifies which option is used by the HP CIFS Client to perform packet signing. The valid entries for this parameter are enbled, required and disabled. By default, this parameter is set to enabled.
Configuration File Configuration Parameters NOTE Windows NT servers do not support SMB over TCP; they do not accept connection requests on the established TCP port for this functionality (port 445). If you have NT servers in your network, and have enabled SMB over TCP, then you must create an "individual server" entry in the configuration file for each NT server. Individual server entries are placed after the "server.default" section, and before the tag "# End of ’server’ section".
Configuration File Configuration Parameters useUnicode This boolean variable specifies whether the HP CIFS Client will use Unicode if the server supports it. domain This string variable defines the domain name the client sends to the server. If undefined, it defaults to an empty string which should be suitable for all known servers. (move to cifs.domain) alwaysEncryptData If this boolean variable is set to yes, only SSL (Secure Socket Layer) connections with the server are accepted.
Configuration File Configuration Parameters dirModeMask This variable can be used to limit the UNIX permissions given to directories by the CIFS. The default setting is 0777. Do not change unless you know what you are doing. ctimeIsCreate This variable defines whether the UNIX ctime (Change Time) is taken from the DOS Creation Time or copied from the file modification time. If this parameter is set to yes, the creation time is used. The default setting is no.
Configuration File Configuration Parameters fakeDirLinks If the server does not supply a number of hard-links for directories, this number is used. The value defaults to 2, if not specified. Some implementations of the UNIX utility find determine whether recursion is necessary or not from the link count. If your find uses this optimization, you may want to fake a high number of links for directories. Alternatively you can switch off the optimization with a commandline switch to find.
Configuration File Configuration Parameters File attributes are cached for this amount of time (in milliseconds). dirCacheTime Directory contents are cached for this amount of time (in milliseconds). maxCachedFiles This is the maximum number of file objects that are held as cache of NFS file handles. If an NFS file handle is requested which is not in the cache, it must be looked up recursively, which may result in a notable performance loss. Recursive lookups are logged as rare events.
Configuration File Configuration Parameters lock The number of pages to read ahead if an oplock was granted. noLock The number of pages to read ahead of no oplock was granted. useWriteBack This variable defines whether cache write- back techniques should be used. Write back is insecure (in terms of error recovery) if used with NFS2, but it may increase performance notably.
Configuration File Configuration Parameters disableSmbs Not every server supports every SMB command equally well. In fact, many commands are unusable on certain server types. The value of this variable is an array which enumerates the SMB commands that should not be used. The respective commands will be replaced by a workaround automatically. The enumeration constants may be taken from the following set: getattrFind Suppresses the use of the trans2/findfirst2 command for reading file attributes.
Configuration File Configuration Parameters Suppresses the use of SMB_COM_OPEN_ANDX for creating files. openOpenX Suppresses the use of SMB_COM_OPEN_ANDX for opening files. readReadX Suppresses the use of SMB_COM_READ_ANDX for reading files. readOpenRead Suppresses the use of SMB_COM_OPEN_ANDX batched with SMB_COM_READ_ANDX for reading files. writeWriteX Suppresses the use of SMB_COM_WRITE_ANDX for writing files.
Configuration File Configuration Parameters Suppresses the TREE_CONNNECT_ANDX command (TREE_CONNECT is used instead). setDirDates Suppresses setting directory modification dates when files are created or deleted in a directory. This may be useful if the server sets the date automatically when directories are modified. 128 fileModeMask This integer variable defines the file permissions. fileModeMask is 0777 by default. Do not change unless you know what you are doing.
Configuration File Configuration Parameters Chapter 7 cifs.servers This variable may modify the values configured with cifs.server.default for specific servers. It consists of a dictionary where the keys are the Netbios names of servers. The value for each server key is also a dictionary. This dictionary has the same structure as the defaultServer dictionary. In addition, the following keys may be used: ipAddress This entry may contain an IP address or a DNS name for the server.
Configuration File Configuration Parameters cifs.serverClasses This variable may modify the values configured with cifs.server.default and servers after the connection has been established based on the information derived from session setup. The decision can depend on the server's operating system and LAN manager type. The format for this variable is an array of dictionaries.
8 PAM NTLM This chapter provides a description of PAM NTLM.
PAM NTLM Introduction Introduction PAM NTLM ( NT Lan Manager) is a Pluggable Authentication Module (PAM) that enables HP-UX users to be authenticated against Windows servers during system login. PAM is an authentication framework in UNIX, used to authenticate users logging into a UNIX system. PAM loads a dynamically loadable module (shared library) that performs the actual authentication. PAM can also be configured to use multiple shared library modules.
PAM NTLM Introduction Configuring PAM NTLM requires you to understand the PAM framework in general. Refer to pam(3), pam.conf(4), and Managing Systems and Workgroups at http://docs.hp.com/hpux/os for more information about PAM.
PAM NTLM PAM NTLM PAM NTLM This section provides a list of PAM NTLM features and a description of the User Map File. PAM NTLM Features • PAM NTLM supports authentication and password management. • PAM NTLM uses a subset of the Samba smb.conf file as its configuration file. See the PAM NTLM Post-installation Instructions below for further information. • PAM NTLM supports username mapping to map a local UNIX user name to a remote CIFS domain user name to use for authentication.
PAM NTLM PAM NTLM Configuration PAM NTLM Configuration Configure the following to set up PAM-NTLM: • The PAM-NTLM module • The system file /etc/pam.conf to use the PAM-NTLM module • A usermap file (optional) Configuring the PAM NTLM Module The PAM-NTLM configuration file is /etc/opt/cifsclient/pam/smb.conf. A default configuration file is also provided (smb.conf.default). Do not change the default configuration file because you may need to refer to it in the future. Table 8-1 ## ## Name: smb.
PAM NTLM PAM NTLM Configuration Configuring the system to use the PAM NTLM Module This task consists of editing the global HP-UX PAM configuration file /etc/pam.conf. IMPORTANT You may not be able to log into the system if PAM is not correctly configured. Make sure that you understand the PAM framework before you modify pam.conf. For information on PAM, see these sections of HP-UX manpages: pam.conf(4), pam_unix(5).
PAM NTLM PAM NTLM Configuration The following are sample pam.conf files with all three PAM NTLM services configured. Each PAM NTLM entry consistes of a line that refers to the shared library libpam_ntlm.1. In the authentication management section, when PAM NTLM is used in conjunction with PAM UNIX, it is recommended that the option try_first_pass be specified with the PAM-UNIX entry, as shown. WARNING If incorrect paths are used in pam.conf, it can become impossible to login to the system.
PAM NTLM PAM NTLM Configuration # login session required /usr/lib/security/$ISA/libpam_unix.so.1 dtlogin session required /usr/lib/security/$ISA/libpam_unix.so.1 dtaction session required /usr/lib/security/$ISA/libpam_unix.so.1 OTHER session required /usr/lib/security/$ISA/libpam_unix.so.1 # # Password management # login auth sufficient /usr/lib/security/$ISA/libpam_ntlm.so.1 login password required /usr/lib/security/$ISA/libpam_unix.so.1 passwd password required /usr/lib/security/$ISA/libpam_unix.so.
PAM NTLM PAM NTLM Configuration # login login passwd dtlogin dtaction OTHER password password password password password password sufficient required required required required required /usr/lib/security/libpam_ntlm.1 /usr/lib/security/libpam_unix.1 /usr/lib/security/libpam_ntlm.1 /usr/lib/security/libpam_unix.1 /usr/lib/security/libpam_unix.1 /usr/lib/security/libpam_unix.
PAM NTLM PAM NTLM Configuration NOTE The NIS map file name domainusermap.byname is the default name that PAM NTLM uses for the NIS map file. You can configure a different NIS user map name in the PAM NTLM configuration file (/etc/opt/cifsclient/pam/smb.conf) of each NIS client. The configuration option is: nis ntuser mapname = 2. In the user map file of each NIS client that will receive the distributed map file, add an entry with the plus sign (+) in the first column of the line.
Index C CIFS description, 13 protocol, 13 cifsclient, 31, 71 cifsclient.cfg, 28 cifslist, 70, 82 cifslogin, 70, 77 cifslogout, 70, 81 cifsmount, 70, 74, 87 cifsumount, 70, 80 Common Internet File System.