HP CIFS Client A.01.09 Administrator’s Guide HP-UX 11.0 and 11i version 1 and 2 Manufacturing Part Number : B8724-90044 August, 2003 U.S.A. © Copyright 2003 Hewlett-Packard Company. .
Legal Notices The information in this document is subject to change without notice. Hewlett-Packard makes no warranty of any kind with regard to this manual, including, but not limited to, the implied warranties of merchantability and fitness for a particular purpose. Hewlett-Packard shall not be held liable for errors contained herein or direct, indirect, special, incidental or consequential damages in connection with the furnishing, performance, or use of this material. Warranty.
Trademark Notices. UNIX is a registered trademark of The Open Group.
Contents 1. Introduction to the HP CIFS Client Introduction to HP CIFS . . . . . . . . . . . . . . . . . . . . . . . . . . . . . . . . . . . . . . . . . . . . . . . . . What is the CIFS Protocol? . . . . . . . . . . . . . . . . . . . . . . . . . . . . . . . . . . . . . . . . . . . . . HP CIFS Client Description . . . . . . . . . . . . . . . . . . . . . . . . . . . . . . . . . . . . . . . . . . . . . . HP CIFS Client Features. . . . . . . . . . . . . . . . . . . . . . . . . . . . . . . . . . . . . . . . . .
Contents Step 3. Configure Kerberos on the HP CIFS Client . . . . . . . . . . . . . . . . . . . . . . . . . . CIFS Client Kerberos Authentication Policies . . . . . . . . . . . . . . . . . . . . . . . . . . . . . . . . Explicit login: cifslogin . . . . . . . . . . . . . . . . . . . . . . . . . . . . . . . . . . . . . . . . . . . . . . . . . Automatic login: Integration with System Kerberos Cache (kinit(1) and PAM Kerberos) . . . . . . . . . . . . . . . . . . . . . . . . . . . . . . . . . . . . . . . . . . .
Contents Synopsis. . . . . . . . . . . . . . . . . . . . . . . . . . . . . . . . . . . . . . . . . . . . . . . . . . . . . . . . . . . . . Description . . . . . . . . . . . . . . . . . . . . . . . . . . . . . . . . . . . . . . . . . . . . . . . . . . . . . . . . . . Options . . . . . . . . . . . . . . . . . . . . . . . . . . . . . . . . . . . . . . . . . . . . . . . . . . . . . . . . . . . . . Files . . . . . . . . . . . . . . . . . . . . . . . . . . . . . . . . . . . . . . . . . . . . . . . . . . . . . . .
Contents 8
Preface: About This Document The latest version of this document can be found on line at: http://www.docs.hp.com This document describes how to install, configure, and troubleshoot HP CIFS Client on HP-UX platforms. The document printing date and part number indicate the document’s current edition. The printing date will change when a new edition is printed. Minor changes may be made at reprint without changing the printing date. The document part number will change when extensive changes are made.
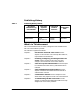
Publishing History Table 1 Publishing History Details Document Manufacturing Part Number Operating Systems Supported Supported Product Versions Publication Date B8724-90022 IA 11.22 1 A.01.08 June 2002 B8724-90011 11.0 11i version 1 A.01.06 A.01.06 June 2001 What’s in This document This manual describes how to install, configurem and troubleshoot the HP CIFS Client software product.
Chapter 7 Configuration File Use this chapter to know a list of all configuration variables if you want to customize HP CIFS Client software. Chapter 8 PAM NTLM Use this chapter to understand detailed information about the PAM NTLM authentication service. Typographical Conventions This document uses the following conventions. Italics Identifies titles of documentation, filenames and paths Bold Text that is strongly emphasized.
1 Introduction to the HP CIFS Client This chapter provides a HP CIFS Client description.
Introduction to the HP CIFS Client It contains the following sections: 14 • Introduction to HP CIFS. • HP CIFS Client Description. • HP CIFS Client Features.
Introduction to the HP CIFS Client Introduction to HP CIFS Introduction to HP CIFS HP CIFS provides HP-UX with a distributed file system based on the Microsoft Common Internet File System (CIFS) protocols. HP CIFS implements both the server and client components of the CIFS protocol on HP-UX.
Introduction to the HP CIFS Client Introduction to HP CIFS HP CIFS uses the CIFS protocol from the HP-UX machines, which enables directories from HP-UX servers to be mounted on to Windows machines and vice versa. PAM NTLM The HP-UX PAM subsystem gives system administrators the flexibility of choosing any authentication service available on the system to perform authentication.
Introduction to the HP CIFS Client HP CIFS Client Description HP CIFS Client Description HP CIFS Client implements the CIFS protocols on HP-UX so that HP-UX users may mount shares from CIFS servers as UNIX file systems.
Introduction to the HP CIFS Client HP CIFS Client Features HP CIFS Client Features Following is a list of the HP CIFS Client major features: • CIFS UNIX Extensions • NTLM PAM Integration • Kerberos Authentication, Integration with System Kerberos Cache • ONC AutoFS 2.3 Support • Support for Internationalized Clients CIFS UNIX Extensions CIFS UNIX Extensions enable the CIFS Client and Samba server to implement standard UNIX file system features.
Introduction to the HP CIFS Client HP CIFS Client Features Kerberos Authentication: Integration with System Kerberos Cache The CIFS Client supports the Kerberos authentication mechanism. Kerberos is a secure, industry-standard authentication protocol. It provides significant improvements over the older NTLM protocol traditionally used by CIFS Clients and Servers. The CIFS servers in your network must support Kerberos in order for you to take advantage of Kerberos support in the HP CIFS Client.
Introduction to the HP CIFS Client HP CIFS Client Features Support for Internationalized Clients The CIFS Client is designed to work with a variety of internationalized clients and servers. It can use Unicode to transmit multi-byte characters on the network, or any of several character encoding tables located in /etc/opt/cifsclient/unitables. See the README file in that directory for an index of the tables.
2 Installing, Configuring, and Using the HP CIFS Client This chapter describes the procedures for installing HP CIFS Client software on your system.
Installing, Configuring, and Using the HP CIFS Client It contains the following sections: 22 • Overview of HP CIFS Client Installation and Configuration • Step 1: Checking HP CIFS Client Installation Prerequisites • Step 2: Installing HP CIFS Client and PAM Software • Step 3: Configuring the HP CIFS Client Configuration • Step 4: Starting and Stopping the HP CIFS Client Daemon Chapter 2
Installing, Configuring, and Using the HP CIFS Client Overview of HP CIFS Client Installation and Configuration Overview of HP CIFS Client Installation and Configuration Installation of the HP CIFS Client includes checking installation prerequisites, loading the HP CIFS Client filesets using the swinstall(1M) utility, and completing HP CIFS configuration procedures. The CIFS Client and PAM NTLM products are delivered in the same bundle, packaged for installation via HP Software Distributor (SD).
Installing, Configuring, and Using the HP CIFS Client Step 1: Checking HP CIFS Client Installation Prerequisites Step 1: Checking HP CIFS Client Installation Prerequisites Prior to loading the HP CIFS Client software onto your system, check that you have met the following hardware and software prerequisites: 1. The HP CIFS client runs on all HP workstations and Servers that are capable of running HP-UX version 11.0 or later, in either 32-bit or 64-bit mode.
Installing, Configuring, and Using the HP CIFS Client Step 2: Installing HP CIFS Client and PAM Software Step 2: Installing HP CIFS Client and PAM Software Follow the steps below to load HP CIFS Client software using the HP-UX swinstall program. 1. Log in as root. 2. Insert the software media (disk) into the appropriate drive. 3. Run the swinstall program using the command: swinstall This opens the Software Selection Window and Specify Source Window. 4.
Installing, Configuring, and Using the HP CIFS Client Step 2: Installing HP CIFS Client and PAM Software View the Install Window to read processing data while the software is being installed. When the Status field indicates Ready and the Note Window opens. swinstall loads the fileset, runs the control scripts for the fileset, and builds the kernel. Estimated time for processing is 3 to 5 minutes. 11. Activate the ok button on the Note Window to reboot the system.
Installing, Configuring, and Using the HP CIFS Client Step 3: Configuring the HP CIFS Client Step 3: Configuring the HP CIFS Client The configuration file for the HP CIFS Client, /etc/opt/cifsclient/cifsclient.cfg, can be used as delivered, with no modification of its default values. Editing cifsclient.cfg If appropriate, edit the HP CIFS client configuration file /etc/opt/cifsclient/cifsclient.cfg as described below. 1.
Installing, Configuring, and Using the HP CIFS Client Step 3: Configuring the HP CIFS Client serverCharMapFile = "/etc/opt/cifsclient/unitables/unimapShiftJIS.cfg"; clientCharMapFile = "/etc/opt/cifsclient/unitables/unimapShiftJIS.cfg"; 3. Authentication Level The configuration parameter, authenticationLevel, should be set to ntlm or kerberos. See “HP CIFS Authentication Using Kerberos” for details. 4. HP recommends that no other configuration modification be made to this file.
Installing, Configuring, and Using the HP CIFS Client Step 4: Starting and Stopping the HP CIFS Client Daemon Step 4: Starting and Stopping the HP CIFS Client Daemon Use the cifsclient command to start and stop the HP CIFS client. The syntax is: /opt/cifsclient/bin/cifsclient The default, when no arguments are used, is to start the daemon. If the HP CIFS client is already running when you execute the command, you will get a message indicating it is already up.
Installing, Configuring, and Using the HP CIFS Client Using the HP CIFS Client Using the HP CIFS Client This section presents summary of how the HP CIFS Client can be used. The basic procedure is (1) start the daemon, (2) mount shared directories, (3) log in to CIFS Servers. These steps and some useful tips follow: 1. Start the daemon.
Installing, Configuring, and Using the HP CIFS Client Using the HP CIFS Client In this example, the share source, configured as a share on the HP CIFS Server, is mounted by the CIFS Client using the directory /home/devl/source as the mount point. The directory used as the mount point must already exist. To mount: $ mount -F cifs buildsys:/source /home/devl/source To unmount: $ umount /home/devl/source 3. Access the shared directory via the mount point on the Client.
Installing, Configuring, and Using the HP CIFS Client Using the HP CIFS Client This succeeds. To verify the results: $ cifslist =========================================================== Server buildsys: =========================================================== Remote Username: root Local Username: root Share: \\BUILDSYS\source rw /home/dev1/source $ cd /home/dev1/source $ _ Normal users (non-root) gain access to CIFS mounts in the same manner.
Installing, Configuring, and Using the HP CIFS Client More on Mounting CIFS Filesystems More on Mounting CIFS Filesystems In addition to the mount command discussed in the previous section, which was used to explicitly create a single mount, there are other methods to manage the mounting of CIFS file systems. See the reference for mount_cifs and umount_cifs in Chapter 4 for syntax details not contained in this section.
Installing, Configuring, and Using the HP CIFS Client More on Mounting CIFS Filesystems $ mount -F cifs -o username=x,password=y buildsys:/source home/dev1/source where x and y are the name and password pair recognized by the server. Depricated mount and unmount commands The cifsmount and cifsumount commands provide equivalent functionality to mount and umount, but HP discourages their use.They require different syntax and may not be available in future releases of the HP CIFS Client.
Installing, Configuring, and Using the HP CIFS Client HP CIFS Client Files and Directories HP CIFS Client Files and Directories This section lists the important files that comprise the HP CIFS Client. Table 2-1 HP CIFS Client Files and Directories File/Directory Chapter 2 Description /opt/cifsclient/ Base directory for all CIFS Client core files and administrative files. /opt/cifsclient/bin/ CIFS Binaries. cifsmount Mounts CIFS Shares from CIFS Servers. Can only be used by root user.
Installing, Configuring, and Using the HP CIFS Client HP CIFS Client Files and Directories Table 2-1 HP CIFS Client Files and Directories (Continued) File/Directory 36 Description /opt/cifsclient/sbin CIFS Clients for use by the administrator or root user. The CIFS Client daemon is contained in this directory. /etc/opt/cifsclient Directory for CIFS Client configuration and localization files. cifsclient.cfg Configuration file accessed by CIFS Client daemon. cifsclient.cfg.
3 CIFS Security and Authentication This chapter provides a description for CIFS Security and Authentication Methods Chapter 3 37
CIFS Security and Authentication Introduction Introduction One of the important characteristics of the CIFS file-sharing protocol is its security model. Before a user on a CIFS client can access the mountpoint of a CIFS server, the user must be authenticated by the server (the user must login to the server). Four login methods are available, they are explained in the following pages. Restrictions at the file or directory level on the server’s filesystem are also enforced by the server.
CIFS Security and Authentication User Authentication Methods User Authentication Methods • Explicit Login (cifslogin) Users on the CIFS Client can authenticate themselves to CIFS servers explicitly with the cifslogin command. Please see the cifslogin man page in Commandline Utilities Chapter. • Automatic Login The CIFS Client provides methods for accessing CIFS mountpoints automatically. The initial request for access to a CIFS mountpoint (cd, ls, etc.
CIFS Security and Authentication User Authentication Methods use the cifslogout -d command to delete an entry from the user database. Please see man pages cifslogin, cifslogout for details. NOTE Automatic login using user database is not supported with Kerberos 4. Guest User This feature enables all users on the HP CIFS Client host who are not logged into a mounted CIFS server to access the server’s mountpoints, with the privileges of a guest user.
CIFS Security and Authentication User Authentication Methods e. As the HP-UX user cifsunix, log in to ntsrv01 as cifspub: $ su cifsunix -c “cifslogin ntsrv01 cifsguest -s” Remote user cifsguest’s password:cifspass Now, when any other UNIX users on the CIFS Client HP-UX host who have not logged into the CIFS server ntsrv01 try to access the mountpoint, /tmnt/cifs01, they will automatically access it as if they were UNIX user cifsunix and CIFS server user cifsguest.
CIFS Security and Authentication User Authentication Methods 42 Chapter 3
4 CIFS Authentication Using Kerberos This chapter provides a description for CIFS Authentication using Kerberos.
CIFS Authentication Using Kerberos Introduction To Kerberos Introduction To Kerberos Kerberos is a distributed authentication service that allows a process (a client) running on behalf of a principal (a user) to prove its identity to a verifier (an application server, or only a server) without sending data across the network that might allow an attacker or the verifier to subsequently impersonate the principal.
CIFS Authentication Using Kerberos Requirements and Limitations Requirements and Limitations Kerberos Key Distribution Center and CIFS Servers For this release, only Windows 2000 is supported for Kerberos authentication. Specifically, Key Distribution Centers (KDCs) and CIFS file servers that participate in Kerberos authentication with the HP CIFS Client must be Windows 2000 systems. Any other supported server platform can be used for traditional NTLM authentication.
CIFS Authentication Using Kerberos Using Kerberos with the HP CIFS Client Using Kerberos with the HP CIFS Client These procedures should be followed to use Kerberos with the HP CIFS Client: Step 1. Review fundamental Kerberos operating principals Step 2. Set up and verify the Kerberos infrastructure Step 3. Configure Kerberos in the HP CIFS Client Step 1.
CIFS Authentication Using Kerberos Using Kerberos with the HP CIFS Client http://www.isi.edu/gost/publications/kerberos-neuman-tso.html • The documentation repository at Massachusetts Institute of Technology (the developer of Kerberos): http://web.mit.edu/kerberos • The Kerberos specification, RFC 1510. An excellent introduction (section 1) and descriptions of message exchanges (section 3): http://ftp.rfc-editor.org/in-notes/rfc1510.
CIFS Authentication Using Kerberos Using Kerberos with the HP CIFS Client The CIFS servers to which you want to connect via Kerberos with the CIFS client must be joined to the Windows Domain. Windows online help contains information on how this can be accomplished. If you want to set up user principals on a Windows 2000 KDC, consult online help for managing user Domain accounts. To set up the HP-UX Kerberos client, consult the Configuration Guide cited above in step 1.
CIFS Authentication Using Kerberos Using Kerberos with the HP CIFS Client Step 3. Configure Kerberos on the HP CIFS Client The configuration parameter, authenticationLevel, specified in the HP CIFS Client configuration file (/etc/opt/cifsclient/cifsclient.cfg) indicates which mechanism should be used by the CIFS Client to authenticate users to CIFS servers. Legal entries for this parameter are ntlm or kerberos. By default, the traditional Windows NT LAN Manager (NTLM) protocol is used.
CIFS Authentication Using Kerberos CIFS Client Kerberos Authentication Policies CIFS Client Kerberos Authentication Policies This section assumes that the CIFS server and client have negotiated the use of Kerberos. Explicit login: cifslogin Kerberos authentication is implemented transparently into this command. Required Kerberos credentials (TGT and ST) are acquired from the KDC on behalf of the user and the Service Ticket (ST) is sent to the CIFS server within a SESSION_SETUP request.
CIFS Authentication Using Kerberos Troubleshooting Kerberos in the HP CIFS Client Troubleshooting Kerberos in the HP CIFS Client • cifsTrace Informative log messages will be produced by Kerberos processing in the HP CIFS Client log file if the cifsTrace log level is enabled. • Temporary credentials files When Kerberos authentication is used, the HP CIFS Client utilizes a temporary file to store users’ credentials during login processing. There is one temporary credentials file per user per server.
CIFS Authentication Using Kerberos Troubleshooting Kerberos in the HP CIFS Client 52 Chapter 4
5 Commandline Utilities This chapter provides details for the CIFS Client Commandline Utilities.
Commandline Utilities cifsclient Stop and start the CIFS client. cifsmount Mount a directory from a remote server. cifslogin Authenticates you to the remote server. You may then use any shares already mounted by other users. cifsumount The opposite of cifsmount. It removes the local mountpoint and disconnects it from the server if it is not mounted somewhere else. cifslogout The opposite of cifslogin. You cannot use any shares from the specified server after logging out.
Commandline Utilities cifsclient cifsclient Synopsis cifsclient { command } cifsclient fuser [-v] mountpoint [...] cifsclient force_umount mountpoint [...] Description This shell script is used to start and stop the HP CIFS Client, and perform other useful tasks. Only users with root capabilities can invoke start, stop, restart, fuser, and force_umount (see also the -a option to klist and kdestroy). Any user can invoke status, klist, kdestroy, and ver.
Commandline Utilities cifsclient directly, specifying the -c {filename} option. CIFS Client Kerberos credentials files are located in /var/opt/cifsclient/krb5_tmp. These files will be present on the system only if the configuration parameter, rmTmpKerbCredFiles, has been set to no. -a (regnized only for root) destroys all files for all users. ver [-vx] Report version information. The following modifiers are also recognized: -v Verbose: display what(1) strings for binaries, scripts and configuration files.
Commandline Utilities cifsclient Files /etc/opt/cifsclient/cifsclient.cfg This file contains run-time configuration options for the HP CIFS Client. For detailed information see Chapter 7. /var/opt/cifsclient/krb5_tmp/krb5cc__ Temporary CIFS Client Kerberos credentials file. is the name of the CIFS server to which the user has been authenticated, is the decimal UID of the user.
Commandline Utilities cifsmount cifsmount You can use the mount command to execute the cifsmount command. Both commands are shown below. Synopsis cifsmount /// [] Description The cifsmount command is used to mount remote shares on the local file system. It mounts the share from server in the local file system at . The mountpoint must exist.
Commandline Utilities cifsmount IP address of server. By default, the hostname of the server is taken from the server specification of the share. This must also be the Netbios host name of the server, if the server enforces correct Netbios names. HP CIFS Client uses Domain Name Server instead of Netbios to resolve server names to IP addresses. If the DNS name of the server is different from the Netbios name, you may supply the DNS name or the server's IP address with this parameter.
Commandline Utilities cifsmount -N Do not prompt for a password. This option may be used to avoid prompting for a password if you do not have a password. -u Enables plain text passwords. The HP CIFS Client refuses to send passwords in plain text to the server by default because this is a security risk. There are tools available that sniff the network for plain text passwords. If you really must send the password in plain text (e.g.
Commandline Utilities cifsmount Examples The following command mounts the share entiredisk from the server bigserver at the local mountpoint /mounts/bigserver and stores the mount and the user/password combination in the user database. cifsmount //bigserver/entiredisk /mounts/bigserver -s Files Mounts, usernames, and passwords are stored encrypted in the HP CIFS Client's user database file. The path to the user database file can be configured in the HP CIFS Client configuration file.
Commandline Utilities cifslogin cifslogin Synopsis cifslogin [] [] Description The cifslogin command is used to authenticate additional users at a server. Only authenticated users may access mounted files. Each user accesses the file at the server with his or her privilege status at that server. Because there must be a one-to-one (many=to-one) mapping from local users to remote user names, every user can log in only once at a given server.
Commandline Utilities cifslogin may supply the DNS name or the server's IP address with this parameter. It is ignored if the server is already connected. -p Sets the connection port. Netbios connections are usually made on port 139. If you want to connect on a different port, you can supply a decimal port number with this parameter. This parameter is ignored if the server is already connected. -P Password given in commandline.
Commandline Utilities cifslogin -f Forces login. When this option is used, the login is done even when the server is not responding. No requests are sent to the server. Consequently, none of the parameters can be checked for validity. -s Saves password in database. Do not use unless you understand the security implications. This option can maintain a database of mounts, username, and passwords.
Commandline Utilities cifslogin Files Usernames and passwords are stored encrypted in the HP CIFS Client's user database file. The path to the user database file can be configured in HP CIFS Client's configuration file. The default path is /var/opt/cifsclient/cifsclient.
Commandline Utilities cifsumount cifsumount You can use the umount command to execute the cifsumount command. Both commands are shown below. Synopsis cifsumount [] cifsumount -a [] Description The cifsumount command is used to unmount any shares mounted with cifsmount. Shares can only be unmounted by the user that mounted the share at the given mountpoint or the superuser. The second variant (with the -a option) unmounts all mounts that are currently served.
Commandline Utilities cifsumount See Also cifsmount, cifslogin, cifslogout, cifslist Chapter 5 67
Commandline Utilities cifslogout cifslogout Synopsis cifslogout [] Description The cifslogout command is used to log the user who uses the command out of the server specified. After issuing cifslogout, the user cannot access any files from that server unless he or she is still stored in the user database. Options -d Deletes password from database. If the user's password is stored in the user database, it is deleted from that database.
Commandline Utilities cifslist cifslist Synopsis cifslist -A lists servers with shares and mountpoints cifslist -U lists users in database cifslist -M lists mounts in database cifslist -S lists connected servers cifslist -s lists shares open at server cifslist -u lists users logged in at server cifslist -m lists mountpoints for share Description The cifslist command is used to view internal tables of HP CIFS Client.
Commandline Utilities mount_cifs, umount_cifs mount_cifs, umount_cifs Mounts and unmounts CIFS file systems. Synopsis mount -F cifs [-ar] [-o option[,option...]] [server:/share mount_point] umount -aF cifs | mount_point Description The mount command mounts file systems. Only a superuser can mount file systems. Other users can use mount to list mounted file systems. Use cifslist -A to view CIFS-specific mounts and user connections. The mount command attaches server:/share to mount_point.
Commandline Utilities mount_cifs, umount_cifs -o keywrd[,keywrd...],keywrd=value[,keywrd=va lue...] Some keywords are specified as keyword/value pairs, some are not. -o options must be delimited by commas; no white space is allowed. For example: -o ro,username=fulton,password=pokey Following are the -o options to mount supported by the CIFS Client (keywords that require values are indicated by "keyword=value"): nbname=nbname Set NetBios name of client. HP CIFS is based on NetBios.
Commandline Utilities mount_cifs, umount_cifs user name at the server, you may use this option to set that name. It is ignored if you are already logged in at the server. password=passwd Password given in commandline. Use this option only if you really have to, because all commandline parameters may show up in the output of the ps command. It makes it possible to pass a dynamically generated password to the server. The password is ignored if the user is already logged in at the server.
6 Troubleshooting and Error Messages This chapter includes information about problems that you may encounter when using the HP CIFS client and explanations of error Chapter 6 73
Troubleshooting and Error Messages messages that might occur with HP CIFS commands.
Troubleshooting and Error Messages Troubleshooting FAQs Troubleshooting FAQs This section includes commonly asked questions about HP CIFS. How to Kill the Daemon with cifsclient stop You should never kill the daemon process directly. Although HP CIFS tries to unmount all mounted shares, it may not be successful and the stale mounts will become unusable and cause problems. The correct way to do it is with cifsclient stop.
Troubleshooting and Error Messages HP CIFS Client Error Messages HP CIFS Client Error Messages This section contains information about HP CIFS Client error messages for the following commands: • cifsclient • cifsmount • cifslogin • cifsumount • cifslogout • cifslist userdb: cannot open file /var/opt/cifsclient/cifsclient.udb cifsclient was unable to open the user database file for the reason given in the message.
Troubleshooting and Error Messages HP CIFS Client Error Messages Almost every Unix machine can be turned into a network sniffer. HP CIFS Client also refuses to store unencrypted passwords in the user database. error: DOS: Access denied The username/password pair you supplied was not accepted by the server. You may try to supply the username explicitly with the -U option.
Troubleshooting and Error Messages HP CIFS Client Error Messages 78 Chapter 6
7 Configuration File The default configuration file should work without modifications. Do not modify the configuration file unless you are sure you know what you are doing.
Configuration File The configuration file is parsed by the HP CIFS Client daemon at startup and when edited. Although it is re-read by the running daemon, not all configuration changes will work immediately. Most options are read into internal variables when they are used. The server configuration, for instance, is transferred into internal structures when a connection to the server is opened.
Configuration File General Structure General Structure Configuration files are built from the following simple syntactic structures: • remarks • strings • arrays • dictionaries Strings, arrays and dictionaries are classified by the generic term "property". Remarks can be written in three forms: /* remark */ as in C, // remark to end of line as in C++ or Objective-C # remark to end of line as in shell scripts. Strings are sequences of alphanumeric characters, including the underscore.
Configuration File General Structure semicolons.
Configuration File Configuration Variables Configuration Variables The following is a list of all variables that may be configured at the top level: logLevels The value of this variable is an array enumerating all logging modes that are active. A logging mode is a string out of the following set: info [0] Logging of informational messages. Should be turned on. error [1] Logging error messages. Should be turned on. debug [2] General debug messages. Used only during debugging.
Configuration File Configuration Variables nfsTrace [7] Provides detailed information about all NFS requests done by the kernel and the respective return values. It is very useful for debugging NFS but should be turned off for normal operation. rare [8] Logging of rare conditions. Used only during debugging. cacheDebug [9] Debugging of the cache's operation. Used only during debugging. cifsTrace [10] Logging of all CIFS commands issued and the respective return values.
Configuration File Configuration Variables cfgParseInterval HP CIFS Client can reparse the configuration file while running. For this feature to work, the HP CIFS Client must poll the file regularly. The variable cfgParseInterval defines the time of this poll cycle in milliseconds. If it is set to 0, the file is only parsed once during startup. The default is 0.
Configuration File Configuration Variables caseConvertFile This variable configures the path to the case conversion table. This file defines the mapping to upper and lower case for all unicode characters. The default is to use no table file and retain the default ISO 8859-1 mapping. A mapping file derived from the Unicode standard is part of the HP CIFS Client distribution. You can find it at unitables/unicase.cfg.
Configuration File Configuration Variables machine, the HP CIFS Client automatically limits the range. Increase the buffer size if you have extremely slow writes. nfsSockTxBuf This integer variable sets the transmit buffer size of the socket used to communicate with the kernel. It is not be necessary to set an explicit buffer size. nfsTransferSize This integer variable defines the maximum block size used in data transfer between the kernel and HP CIFS Client. The maximum allowed value is 8k (8192).
Configuration File Configuration Variables mtabName This string variable defines the hostname used in mount table entries and in the output of mount(1M) and bdf(1M). If it is set to the null string: mtabName = “ “ the entry is displayed in the stardard UNIX format for mounted filesystems. connectTimeout This integer variable defines the maximum time in milliseconds that is waited for a connection to succeed. You probably have to increase the time if you are on a slow network.
Configuration File Configuration Variables absolute timeout for NFS requests. A value of 50 (5 seconds) avoids frequent retries of already running (slow) requests and ensures a total timeout of about 2 minutes. This should be sufficient even for the slowest devices and links. If you use a jukebox, it may also be necessary to increase requestTimeout. nfsRetransmit This integer variable defines the number of retries the kernel attempts when HP CIFS Client does not reply in time.
Configuration File Configuration Variables lookupStrategy As you probably know, the HP CIFS Client maps between NFS requests and SMB/CIFS requests. On the NFS side, files are referenced by unique identifiers, called NFS file handles. On the HP CIFS side, files are referenced simply by their path. The HP CIFS Client must be able to determine the path given to an NFS file handle.
Configuration File Configuration Variables This is the most secure and most compatible approach. The disadvantage is that all this information must be kept in memory. The HP CIFS Client needs about 500kB more real memory and about 10MB more virtual memory for each share that uses this strategy. The database strategy is the default. caseSensitive This is a boolean variable (possible values yes or no) which specifies whether filenames on the server are case sensitive.
Configuration File Configuration Variables domain This string variable defines the domain name the client sends to the server. If undefined, it defaults to an empty string which should be suitable for all known servers. alwaysEncryptData If this boolean variable is set to yes, only SSL (Secure Socket Layer) connections with the server are accepted. If set to no, SSL is negotiated with the server.
Configuration File Configuration Variables execMapping WARNING This enumeration variable is useful for files stored on Windows servers. It defines which DOS attribute whould be mapped to the UNIX execute permission. The following keywords are valid: archive, system, hidden, on, or off. Default is on. A side-effect of execMapping is that if the configured attribute is set on the NT server, the file will be listed on the UNIX Client with the execute bit set for all users (owner, group, and other).
Configuration File Configuration Variables of links for directories. Alternatively you can switch off the optimization with a commandline switch to find. enableFakeLinks If this boolean variable is set to yes, the HP CIFS Client can do softlinks on Windows-servers. These softlinks can be used by the HP CIFS Client clients only. On the Windows server they look like ordinary files with special attributes set (system and hidden attributes, if you have not modified the configuration).
Configuration File Configuration Variables server character set is performed. Regardless of this variable, the HP CIFS Client can read symbolic link files in both formats. attributesCacheTime File attributes are cached for this amount of time (in milliseconds). dirCacheTime Directory contents are cached for this amount of time (in milliseconds). maxCachedFiles This is the maximum number of file objects that are held as cache of NFS file handles.
Configuration File Configuration Variables noLock The keep-open time in milliseconds if no lock has been granted. dataCacheTimeNoLock If no oplock has been granted, no caching should be done. This might result in bad performance on servers that do not support oplocks. This value sets a cache-valid time (in milliseconds) that is used if no oplock was granted. readAhead This variable defines the number of cache pages to read ahead.
Configuration File Configuration Variables If you care about reliability, always leave these options off. This configuration variable is also passed to the server. There are server/OS combinations (notably Samba/Linux) which become very slow in writethrough mode. You may want to configure write back for these. requestOplock This boolean variable defines whether oplocks should be requested from the server.
Configuration File Configuration Variables trans2/findfirst2 is the best way to query attributes, so only disable it if you need to. getattrTrans2QueryPath Suppresses the use of the trans2/query_pathinfo command for reading file attributes. Trans2/query_pathinfo seems to be broken on Windows 95. attrUnix Disables the UNIX extensions for file attributes. setattrTrans2SetFile Suppresses the command trans2/setfileinfo to be used for setting file attributes. This SMB command does not work properly on NT.
Configuration File Configuration Variables Suppresses the use of SMB_COM_OPEN_ANDX for creating files. openOpenX Suppresses the use of SMB_COM_OPEN_ANDX for opening files. readReadX Suppresses the use of SMB_COM_READ_ANDX for reading files. readOpenRead Suppresses the use of SMB_COM_OPEN_ANDX batched with SMB_COM_READ_ANDX for reading files. writeWriteX Suppresses the use of SMB_COM_WRITE_ANDX for writing files.
Configuration File Configuration Variables Suppresses the use of trans2/query_fs_info for reading file system infos. sessionSetup Suppresses the session setup command (only used for core dialect). treeconAndX Suppresses the TREE_CONNNECT_ANDX command (TREE_CONNECT is used instead). setDirDates Suppresses setting directory modification dates when files are created or deleted in a directory. This may be useful if the server sets the date automatically when directories are modified.
Configuration File Configuration Variables tcpPort You may change the TCP port that is used to connect to the server here. Default is 139, the Netbios session service port. serverClasses This variable may modify the values configured with defaultServer and servers after the connection has been established based on the information derived from session setup. The decision can depend on the server's operating system and LAN manager type. The format for this variable is an array of dictionaries.
Configuration File Configuration Variables The array is searched from the first to the last entry. If an entry matches, the corresponding configuration is used and the search is aborted.
8 PAM NTLM This chapter provides a description of PAM NTLM.
PAM NTLM Introduction Introduction PAM NTLM ( NT Lan Manager) is a Pluggable Authentication Module (PAM) that enables HP-UX users to be authenticated against Windows servers during system login. PAM is an authentication framework in UNIX, used to authenticate users logging into a UNIX system. PAM loads a dynamically loadable module (shared library) that performs the actual authentication. PAM can also be configured to use multiple shared library modules.
PAM NTLM Introduction Configuring PAM NTLM requires you to understand the PAM framework in general. Refer to pam(3), pam.conf(4), and Managing Systems and Workgroups at http://docs.hp.com/hpux/os for more information about PAM.
PAM NTLM PAM NTLM PAM NTLM This section provides a list of PAM NTLM features and a description of the User Map File. PAM NTLM Features • PAM NTLM supports authentication and password management. • PAM NTLM uses a subset of the Samba smb.conf file as its configuration file. See the PAM NTLM Post-installation Instructions below for further information. • PAM NTLM supports username mapping to map a local UNIX user name to a remote NT domain user name to use for authentication.
PAM NTLM PAM NTLM Configuration PAM NTLM Configuration Configure the following to set up PAM-NTLM: • The PAM-NTLM module • The system file /etc/pam.conf to use the PAM-NTLM module • A usermap file (optional) Configuring the PAM NTLM Module The PAM-NTLM configuration file is /etc/opt/cifsclient/pam/smb.conf. A default configuration file is also provided (smb.conf.default). Do no change the default configuration file because you may need to refer to it in the future. Table 8-1 ## ## Name: smb.
PAM NTLM PAM NTLM Configuration Configuring the system to use the PAM NTLM Module This task consists of editing the global HP-UX PAM configuration file /etc/pam.conf. IMPORTANT You may not be able to log into the system if PAM is not correctly configured. Make sure that you understand the PAM framework before you modify pam.conf. For information on PAM, see these sections of HP-UX manpages: pam.conf(4), pam_unix(5).
PAM NTLM PAM NTLM Configuration The following are sample pam.conf files with all three PAM NTLM services configured. Each PAM NTLM entry consistes of a line that refers to the shared library libpam_ntlm.1. In the authentication management section, when PAM NTLM is used in conjunction with PAM UNIX, it is recommended that the option try_first_pass be specified with the PAM-UNIX entry, as shown. WARNING If incorrect paths are used in pam.conf, it can become impossible to login to the system.
PAM NTLM PAM NTLM Configuration # login session required /usr/lib/security/$ISA/libpam_unix.so.1 dtlogin session required /usr/lib/security/$ISA/libpam_unix.so.1 dtaction session required /usr/lib/security/$ISA/libpam_unix.so.1 OTHER session required /usr/lib/security/$ISA/libpam_unix.so.1 # # Password management # login auth sufficient /usr/lib/security/$ISA/libpam_ntlm.so.1 login password required /usr/lib/security/$ISA/libpam_unix.so.1 passwd password required /usr/lib/security/$ISA/libpam_unix.so.
PAM NTLM PAM NTLM Configuration # login login passwd dtlogin dtaction OTHER password password password password password password sufficient required required required required required /usr/lib/security/libpam_ntlm.1 /usr/lib/security/libpam_unix.1 /usr/lib/security/libpam_ntlm.1 /usr/lib/security/libpam_unix.1 /usr/lib/security/libpam_unix.1 /usr/lib/security/libpam_unix.
PAM NTLM PAM NTLM Configuration NOTE The NIS map file name domainusermap.byname is the default name that PAM NTLM uses for the NIS map file. You can configure a different NIS user map name in the PAM NTLM configuration file (/etc/opt/cifsclient/pam/smb.conf) of each NIS client. The configuration option is: nis ntuser mapname = 2. In the user map file of each NIS client that will receive the distributed map file, add an entry with the plus sign (+) in the first column of the line.
Glossary A E ACL Access Control List, meta-data that describes which users are allowed access to file data and what type of access is granted to that data. ACLs define access rights. In this scheme, users typically belong to "groups," and groups are given access rights as a whole. Typical types of access rights are read (list), write (modify), or create (insert). Different file systems have varying levels of ACL support and different file systems define different access rights.
Glossary SMB 114 Glossary
Index C CIFS description, 15 protocol, 15 cifsclient, 30, 55, 76 cifsclient.cfg, 27 cifslist, 54, 69 cifslogin, 54, 62 cifslogout, 54, 68 cifsmount, 54, 58, 70 cifsumount, 54, 66 Common Internet File System.
Index U unmount command, 30 unmount_cifs, 70 user map file, 106 user map files, 111 using client, 30 utilities, summary, 53 116