
HP-UX AAA Server A.08.02 Administrator's Guide
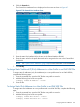

2. Associate the user profile with the filter ID.
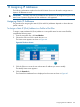
• If the user profile is stored in a AAA server users file (grouped by realm or the default
file), select the General tab from the User Attributes screen and specify the ID in the Filter
ID field.
• If the user profile is stored in an LDAP LDIF file, add the following line to the user profile:
aaaReply: Filter-ID = value
Limiting Access Points (NAS-Port, NAS-ID, Calling-Station ID, and others)
You can control what connection point a user must use to access your network by restricting access
to specific NASs or phone numbers.
If the user profile is stored in a AAA server users file (grouped by realm or the default file), assign
values to the User Attributes fields that can limit access:
• Assign a NAS Port value (under the NAS/Login tab) to limit access to a specific dial-in
connection identified by port.
• Assign a NAS ID value (under the NAS/Login tab) to limit access to a specific dial-in connection
identified by NAS.
• Assign a Calling-Station-ID value (under the Others tab) if the user must always access service
from a single location (defined by a phone number).
If the user profile is stored in an LDAP LDIF file, add the following lines to the user profile:
aaaCheck: NAS-Port = Port-number
aaaCheck: NAS-ID = value
aaaCheck: Calling-Station-ID = Phone-number
Denying Access (Called-Station-ID and others)
You can deny users access through a connection point by adding deny items to the user profile.
• If the user profile is stored in a AAA server users file (grouped by realm or the default file),
select the Free tab from the User Attributes screen and then enter the following in the Check
text box according to the limits you want to set:
NAS-Port != Port-number
NAS-ID != value
Calling-Station-ID != Phone-number
• If the user profile is stored in an LDAP LDIF file, add the following lines to the user profile:
aaaCheck: NAS-Port = Port-number
aaaCheck: NAS-ID = value
aaaCheck: Calling-Station-ID = Phone-number
Limiting Simultaneous Sessions
You can limit the number of concurrent sessions a user can maintain when accessing your network.
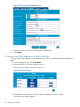
Before you can configure the simultaneous sessions limit for a user profile, you must identify the
users realm in the servers configuration even if the user is not grouped by realm.
1. From the navigation tree, click Local Realms.
2. If the users realm is not already identified, follow the appropriate procedure to add a realm
to the server configuration. If the realm is already configured, select the realm name from the
Realms screen.
3. In addition to completing the other required fields in the Realm Attributes screen, select the
Yes radio button for Session Tracking.
4. Save the realm.
Session Limits 121