
Using HP-UX Workload Manager: A quick reference
8
c. Move the process to another group.
Use the process ID (PID) for loop.pl from the last step to move loop.pl to the group g3:
# /opt/prm/bin/prmmove g3 -p loop.pl_PID
In this case, loop.pl_PID is 6793.
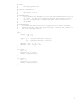
7. Verify workload group assignments:
The ps command has two options related to WLM:
-P shows PRM IDs (workload group IDs) for each process.
-R workload_group shows ps listing for only the processes in workload_group.
Looking at all the processes, the output includes the following items (column headings are
included for convenience):
# ps -efP | grep loop
PRMID PID TTY TIME COMMAND
g3 6793 ttyp1 1:52 loop.pl
g3 6463 ttyp1 7:02 loop3.pl
g2 6462 ttyp1 4:34 loop2.pl
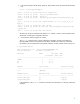
Focusing on the group g3, the output is:
# ps -R g3
PID TTY TIME COMMAND
6793 ttyp1 1:29 loop.pl
6463 ttyp1 6:41 loop3.pl
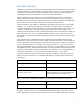
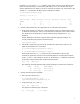
8. Check usage of CPU resources:
The wlminfo command shows usage of CPU resources (CPU utilization) by workload group.
The command output, which might be slightly different on your system, follows:
# /opt/wlm/bin/wlminfo group
Workload Group PRMID CPU Shares CPU Util Mem Shares Mem Util State
OTHERS 1 65.00 0.00 - - ON
g2 2 15.00 14.26 - - ON
g3 3 20.00 19.00 - - ON
This output shows that both groups are using CPU resources up to their allocations. If the
allocations were increased, the groups’ usage would probably increase to match the new
allocations.
9. Stop WLM:
# /opt/wlm/bin/wlmd -k