
Resizing partitions automatically with HP-UX Workload Manager


24
priority at which to use Temporary Instant Capacity (TiCAP) or Pay per use (PPU) resources, and
the reserve threshold that determines when WLM stops activating temporary capacity resources.
The following is an example configuration file:
par {
interval = 10;
utilitypri = 2 ;
utility_reserve_threshold = 10;
}
If you change the interval, be sure you use a value at least twice the size of the largest interval
used in any of the WLM configurations on the managed partitions. Use the utilitypri keyword
to control how TiCAP or PPU adjusts CPU resource capacity when needed. Using this keyword also
ensures that WLM maintains compliance with your TiCAP codeword: when your usage rights
expire, WLM no longer attempts to activate temporary resources. By default, WLM stops activating
temporary capacity resources when 15 or fewer processing days of temporary capacity remain
available. You can change this default by setting the utility_reserve_threshold keyword.
For more information on the syntax of the wlmpard configuration file, see the wlmparconf(4)
manpage or the HP-UX Workload Manager User’s Guide.
3. Activate the file, allowing WLM to move cores among partitions: # wlmpard –a config_file
Monitoring WLM
After you have set up your initial WLM configurations, you can use the wlminfo command to
monitor and fine-tune the configurations. For information on the wlminfo command, see the
wlminfo(1M) manpage.
The wlminfo command, available in /opt/wlm/bin/, displays information about SLOs, metrics,
workload groups, virtual partitions, nPartitions, and the current host.
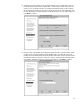
The following command shows output for the partitions being managed by the wlmpard on the
system where wlminfo is invoked:
# /opt/wlm/bin/wlminfo par
Hostname Intended Cores Cores Cores Used Interval
wlmdemo1 4 4 0.01 5
wlmdemo 3 3 2.18 5
This output shows the partition wlmdemo1 has 4 cores and wlmdemo has 3 cores.
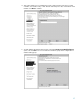
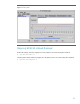
The wlminfo utility also has a graphical interface. To use this interface, use the -i option:
% wlminfo -i
You can also reach this interface through the command wlmgui. With this interface, you can view
graphs on resource allocation for partitions. By default, “Cores” and “Cores Used” are graphed for
the selected partition.
The following figure shows how many cores are allocated to the partition wlmdemo and the amount
of cores actually being used. Because a usage goal is affecting the partition’s CPU allocation, the
partition gets additional cores when it uses more than a certain percentage of its current allocation.
Similarly, when the partition is using less than a certain percentage of its allocation, WLM removes
cores from the partition if they are needed elsewhere. In the figure, the number of cores used, which
is shown by the more jagged line in the graph, increases to 2; as a result, WLM increases the
allocation from 2 cores to 3, as shown by the straighter line (which is above the line showing cores
used). The vertical axis goes to 3, representing the cores available in the virtual partition.