
Resizing partitions automatically with HP-UX Workload Manager


11
Automatically resizing partitions
Depending on the number of workloads you have per partition and the level of isolation you desire
for those workloads within the partition, you have two options when configuring WLM on a partition:
• If the partition has only one workload—or multiple workloads that do not need to be isolated from
one another—you can simplify your WLM configuration steps by relying on default WLM behavior,
as explained in “Configuring HP-UX Workload Manager on a partition without isolating the
partition’s workloads” on page 11.
• If the partition has multiple workloads, some of which must be separated from the others, you can
use WLM workload groups to isolate them. This type of isolation requires additional WLM
configuration to place your workloads in the groups, as discussed in “Configuring HP-UX Workload
Manager to isolate the workloads within the partition” on page 12.
You do not have to set up all the partitions on a single system in the same manner.
Configuring HP-UX Workload Manager on a partition without isolating
the partition’s workloads
This section explains how to configure WLM on a partition that has either a single workload or
multiple workloads that do not need to be isolated. WLM treats the partition as a single workload.
To configure WLM to move cores among partitions without isolating the partition’s workloads:
1. Set up your partitions as you would normally:
For virtual partitions versions before v4.x (starting with 4.x, vPars no longer have the concept of
bound/unbound CPUs):
a. Ensure the system has enough floating (unbound) CPUs so that WLM can reassign the CPUs as
needed.
b. Ensure that each virtual partition has enough fixed CPUs to handle the I/O required for that
virtual partition.
For nPartitions, install and configure Instant Capacity (iCAP, formerly known as iCOD) software on
each nPartition. WLM uses Instant Capacity to simulate movement of cores among nPartitions.
Consequently, Instant Capacity must be installed and properly configured on each nPartition.
2. Install WLM A.03.02 on each partition (for installation instructions, see the WLM release notes
available at http://docs.hp.com/hpux/netsys/index.html#HP-UX%20Workload%20Manager).
3. Set up WLM in each partition where you have a single or multiple workloads that do not need to
be isolated.
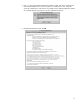
a. Copy the configuration /opt/wlm/examples/wlmconf/par_usage_goal.wlm to /tmp/. The file
is commented to explain its various parts. Read the file to understand how WLM uses it.
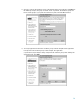
b. Edit the primary_host line in /tmp/par_usage_goal.wlm. Set the primary_host keyword
equal to the name of the host where you will run the WLM global arbiter, wlmpard.
c. Distribute the WLM configuration to all the other partitions in the system (where you have a
single workload or multiple workloads that do not need to be isolated), and customize it:
i) Copy the configuration you just created in /tmp/par_usage_goal.wlm to another partition
in the system.
ii) Adjust the priority of the SLO, indicated in the pri line, to reflect its importance relative to
the SLOs of all the workloads in the other partitions.
iii) Repeat for each remaining partition.