Resizing partitions automatically with HP-UX Workload Manager Audience ...................................................................................................................................... 2 Introduction ................................................................................................................................... 2 What is HP-UX Workload Manager? .................................................................................................
Audience This paper is intended for individuals interested in using one or both of the following technologies to isolate applications while also maintaining a desired level of performance from those applications: • HP-UX virtual partitions • nPartitions with HP Instant Capacity You must have Instant Capacity software installed on each nPartition to be managed by HP-UX Workload Manager (WLM). The paper explains how to manage partitions, adding and removing processors as needed, using HP-UX WLM A.03.
WLM is most effective in managing applications that are CPU-bound. It adjusts the CPU allocation of a group of processes known as a workload, basing the adjustment on the current needs and performance of applications in that workload.
– – On the Integrity VM host, run WLM with a strictly host-based configuration designed exclusively for moving cores across partitions or activating Temporary Instant Capacity (TiCAP) or Pay per use (PPU) cores. For purposes of this paper, using WLM on an Integrity VM host is the same as using WLM to manage an nPartition with a strictly host-based configuration. Inside any Integrity VM (guest), run WLM to manage resources of the guest HP-UX resources.
WLM is optimized for moving cores among hosts such as virtual partitions and nPartitions. Using hosts as workloads, WLM manages workload allocations while maintaining the isolation of their HP-UX instances. The tools WLM uses to manage cores depend on the software enabled on the complex— such as Instant Capacity, Pay per use, and virtual partitions (vPars). WLM can manage nested workloads, with workloads based on FSS groups and pSets inside virtual partitions inside nPartitions.
Why use HP-UX Workload Manager with virtual partitions or nPartitions? Virtual partitions and nPartitions offer the ability to run multiple instances of the HP-UX operating system on a single system. You can run several applications per partition or isolate an application by giving it a partition to itself.
WLM offers wlmpard for managing Instant Capacity or PPU resources. For more information on this, see the wlmpard(1M) manpage. See also “Configuring automatic partition resizing” in this paper. With Instant Capacity v6 or earlier, do not include spaces in partition names. Also, if icod_stat or icapstatus truncate the name of an nPartition, use parmodify to shorten the name so that it is not truncated.
– If Pay per use is on the complex, it must be v7 or later. You can configure WLM to manage FSS and pSet-based workload groups and partitions at the same time. Observe the software restrictions that apply to using pSet-based groups with virtual partitions, Instant Capacity, and Pay per use, as noted previously. For more information on restrictions, see the WLM release notes available at: http://docs.hp.com/hpux/netsys/index.
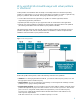
The WLM global arbiter continuously: • Takes requests from the WLM instances in each partition • Decides how to allocate cores to the partitions based on the priorities of the SLOs and the performance of the partitions’ workloads against those SLOs • Adds cores to, or removes cores from, the various partitions In addition: • The global arbiter adds data to the statistics log /var/opt/wlm/wlmpardstats if enabled through the wlmpard -l option.
Figure 2.
Automatically resizing partitions Depending on the number of workloads you have per partition and the level of isolation you desire for those workloads within the partition, you have two options when configuring WLM on a partition: • If the partition has only one workload—or multiple workloads that do not need to be isolated from one another—you can simplify your WLM configuration steps by relying on default WLM behavior, as explained in “Configuring HP-UX Workload Manager on a partition without isolating t
d. Start the WLM daemon, wlmd, on each partition: # /opt/wlm/bin/wlmd –a /tmp/par_usage_goal.wlm 4. Set up the WLM global arbiter in the “primary host” partition as described in “Configuring automatic partition resizing” (on page 23). Configuring HP-UX Workload Manager to isolate the workloads within the partition If you must isolate your workloads within a partition, you can place them in WLM workload groups. These groups then share the cores allocated to the partition they are in.
i) Enter 128 when prompted for the maximum number of CPUs. This value is used because the maximum number of CPUs (cores) a system can currently have is 128. Using this value, the configuration can be used on any system you have without modification. (HP-UX 11i currently supports only up to 64 cores in a single HP-UX instance.) ii) Read the introductory text and click OK.
iii) Specify a name for the workload group in the field Workload Group Name. Click Next. In the following example, the group is named “Sales.” By default, the workload groups are based on FSS groups. If you prefer to base them on pSets, select the Yes checkbox. iv) To assign applications to the Sales workload group, enter the full path of the application to be placed in the workload group. In this example, the application /opt/sales/bin/report.maker is being assigned to the workload group.
v) To place additional applications in this workload group, repeat step iv. If you have no more applications to place in the current group, click Next. vi) Specify slo_Sales as the SLO in the SLO Name field. Set the priority for the Sales group by moving the slider or entering an integer value in the text field and then clicking Next. This priority is in relation to the workloads on all the partitions. In this example, the priority is set to 1.
vii) Set the CPU allocation to CPU Usage. This type of allocation ensures the group is allocated CPU resources based on how much it uses. As a result, a workload group’s CPU allocation is reduced if it is not consuming enough of its current allocation. Any cores that are freed can then be moved by WLM to partitions with workloads in need of more CPU resources.
ix) This screen enables you to conditionalize an SLO, making it active only when a certain condition, such as time of day, is met. This SLO will always be active, so this feature is not needed. Click Next to continue. x) To finish defining the Sales workload group, select the Commit Current Workload Group option, and click Next. You can now add more workload groups to the configuration or edit the existing group.
xi) Add another group by selecting Add Another Workload Group, and click Next. CPU allocation choices for the new groups include, but are not limited to: – – – A usage goal, which is demonstrated above Fixed allocation Time-based allocation, in which a workload group gets CPU resources for a specified period of time. This is described in the white paper, “Getting started with HP-UX Workload Manager,” available at: http://www.hp.com/products1/unix/operating/docs/wlm.gettingstarted.
xiii) After you isolate all your applications in workload groups, to continue your WLM configuration, select the Proceed to Next Step option and click Next. xiv) The following screen enables you to assign a user’s processes to any of the workload groups you just defined. In this example, you are concerned only with placing applications in our workload groups. The processes of any users you do not assign to a group will run in the OTHERS workload group by default.
xv) The following screen enables you to set global tunables for your configuration. Leave all but the Frequency field set to the defaults. Enter 5 in the Frequency field. (This value was chosen so you can quickly evaluate your partition management. After you have verified the management is working as expected, increase this value to 60 and restart wlmd. Also, increase the interval value in the wlmpard configuration file to 120 and restart wlmpard.) Click Next to continue.
xvii) Save the configuration. In this example, the file is saved as /tmp/vpar2.wlm because you are working with virtual partitions. Click Next to continue. Review the final screen for information about how to activate the configuration, which instructs WLM to take control of the partition’s resource allocation, and how to stop WLM. When you are ready, click Finish.
The configuration generated by the wizard appears in the following example. It includes two groups (Finance and Orders) that were created using the wizard, although their creation was not shown in the preceding steps. # # HP-UX WLM configuration: originally created using wlmcw(1M). # # # Primary host for the dynamic partition setup. # primary_host = "myserver"; # # The PRM structure is used to define workload groups and optionally # assign applications and users to those groups.
# # SLO (Service-Level Objective) structure. # slo slo_Orders { # Priority of this SLO. pri = 1; # The workload group this SLO applies to. entity = PRM group Orders; # Request no less than mincpu of available shares. mincpu = 1; # Grant no more than maxcpu shares for this SLO. maxcpu = 12800; # Allocate available CPU shares to achieve goal. goal = usage _CPU; } # # Global tune structure is used to set values to global tune variables.
priority at which to use Temporary Instant Capacity (TiCAP) or Pay per use (PPU) resources, and the reserve threshold that determines when WLM stops activating temporary capacity resources. The following is an example configuration file: par { interval = 10; utilitypri = 2 ; utility_reserve_threshold = 10; } If you change the interval, be sure you use a value at least twice the size of the largest interval used in any of the WLM configurations on the managed partitions.
Figure 3.
For more information To learn more about the Adaptive Enterprise and virtualization, visit: • http://www.hp.com/go/virtualization For more information on HP partitions, visit: • http://www.hp.com/go/partitions • http://docs.hp.com/hpux/os/11i/ (search for the partitions documentation) For more information on HP Integrity VM, visit: • http://www.hp.com/go/vse (click the Solutions components tab) For more information on HP Instant Capacity, visit: • http://www.hp.