HP-UX ProviderSvcsBase administrator guide HP-UX 11i v3 HP Part Number: 5900-1799 Published: September 2011
© Copyright 2009–2011 Hewlett-Packard Development Company, L.P Legal Notices ©Copyright 2009–2011 Hewlett-Packard Development Company, L.P.Confidential computer software. Valid license from HP required for possession, use or copying. Consistent with FAR 12.211 and 12.212, Commercial Computer Software, Computer Software Documentation, and Technical Data for Commercial Items are licensed to the U.S. Government under vendor’s standard commercial license.
Contents 1 Introduction...............................................................................................4 Overview................................................................................................................................4 Features and Benefits................................................................................................................4 2 Installing the PSB Software...........................................................................
1 Introduction This chapter introduces the ProviderSvcsBase (PSB) software and its components. Following are the topics discussed in this chapter: • Overview • Features and Benefits Overview The ProviderSvcsBase™ software provides functionality to support WBEM providers delivered in other product bundles, like SysFaultMgmt™ bundle and Providerdefault™ bundle. The PSB™ software operates within the Web-Based Enterprise Management (WBEM) environment.
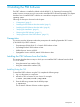
2 Installing the PSB Software The PSB™ software is installed by default with the HP-UX 11i v3 Operating Environment (OE) media. However, at some point you may need to install the PSB™ software separately. This chapter describes how to install the PSB™ software as a standalone component on the HP-UX 11i v3 operating system.
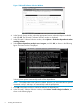
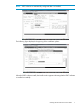
Figure 1 SD Install Software Selection Window 4. 5. 6. In the Specify Source window, select the appropriate location where the depot is available and click OK. The SD Install - Software Selection window is displayed. In the SD Install - Software Selection window, select Options-> Autoselect dependencies when marking software. Select Enforce dependency analysis errors in agent, and click OK, as shown in the following figure. The Note window is displayed.
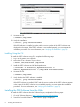
NOTE: PSB™ software is automatically configured after it is installed. The following figure displays the beginning of the installation phase: When the PSB™ software installs, the Install window appears indicating that the PSB™ software is installed successfully.
9. Unmount the CD. # unmount /tmp/cdrom 10. Verify the installation. # swlist | grep ProviderSvcsBase If the PSB software is installed, product and the version number of the PSB™ software are displayed in the output. If the PSB™ software is not installed properly, you must repeat the installation procedure. For more information, see “Verifying the Installation” (page 9). Installing Using the CLI To install the PSB™ software using CLI, complete the following steps: 1. 2.
3. 4. 5. 6. 7. 8. Go to the Installation page and review the Prerequisites to ensure that your system meets the requirements. Select the Receive for Free >> option at the bottom right of the page. Select the appropriate release of the HP-UX operating system. Enter your registration information. Read and accept the terms and conditions. Click Next >> at the bottom right of the page. Click the appropriate link under Download Software to download the software.
The Logfile, which includes details about the installation, is displayed. If there are no errors in the Logfile, the PSB™ software is installed properly. If the PSB software is not installed appropriately, then error messages are logged in this file. You need to rectify these errors and re-install PSB. To re-install PSB repeat this procedure. 3.
3. For information about installation-related errors, enter the following command at the HP-UX prompt: # swjob -a log @ :/ For example, enter the following command at the HP-UX prompt: # swjob -a log hpdst6-0004 @ hpdst.cup.hp.com:/ Removing the PSB Software This section describes how to remove the PSB™ software using the TUI and the CLI. CAUTION: Removing the PSB™ software makes your system vulnerable to failure.
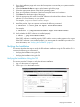
4. Select Actions->Mark for Remove in the SD Remove window, as shown in the following figure: 5.
6. Click OK in the Remove Analysis window to confirm the removal of the PSB™ software. 7. When the PSB™ software is removed, the Remove Window is displayed. 8. Verify whether the PSB™ software is removed properly. # swlist | grep ProviderSvcsBase If the PSB™ software is removed properly, PSB™ and the version number of the PSB™ software does not appear in the output. If the PSB™ software is not removed properly, you must repeat the removal procedure.
2. Enter the following command at the HP-UX prompt: # swjob If the output contains no errors, the PSB™ software is removed successfully. If the PSB™ software is not removed properly, you must repeat the removal procedure. See “Removing the PSB Software” (page 11) for instructions on how to remove the PSB™ software. 3.
3 Using PSB Components This chapter provides information about using PSB™ software components. The PSB™ software includes three components to support the features mentioned in the section “Features and Benefits” (page 4). The three components are: • A new daemon oserrlogd to access kernel error log on all HP Integrity servers running on HP-UX 11i v3 March 2009 or later. • Infrastructure to run health tests on HP-UX system. • postgres database to archive system logs and events.
NOTE: The oserrlogd daemon is supported on all HP Integrity servers running on HP-UX 11i v3 March 2009 or later. The diagmond daemon, which is part of the OnlineDiag bundle, is supported on HP-UX 11i v2 and HP-UX 11i v3 PA-RISC and Itanium based systems. The two daemons can co-exist on a system. For more information on diagmond daemon, see Online Diagnostics (EMS and STM) Administrator's Guide March 2011, Under Chapter 1 Introduction —> Support Tools Manager available at the following location http://www.
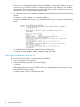
The default value is set to 10. WARNING! Changes to the configuration file can affect all clients that consume events from oserrlogd daemon, hence these values must be changed only after due consideration. Running System Device Health Test in PSB Using GUI To configure and view the health test of CPU, memory, or disk from SMH web page, follow these steps: 1. Select Memory/Processors under System sub-category on the HP SMH home page. The Memory / Processors web page will be displayed.
$/opt/propplus/bin/cprop -runtest -c -t < Test name> -loop -stress -log -nowait Where: -c is an option used to specify the resource on which the health test will be run. You can specify processor, memory, or disk as the resource for testing. -t is an option used to specify the test name. is an option used to specify the number of times a health test must be executed on the system. The default value is 1 and the valid range is [1,99].
Support and Other Resources This document describes how to install, administer, and troubleshoot the ProviderSvcsBase™ (PSB) software and its components. Document updates may be issued between editions to correct errors or to document product changes. To ensure that you receive the updated or new editions, subscribe to the appropriate product support service. Contact your local HP sales representative for more information. This document can also be found online at: http://www.hp.
ComputerOutput Text displayed or generated by the system. UserInput Commands and other text that you type. Command A command name or qualified command phrase. Variable The name of a variable that you can replace in a command or function or information in a display that represents several possible values. [ ] The contents are optional in formats and command descriptions. If the contents are a list separated by |, you can choose one of the items.