
Veritas Volume Manager 5.0.1 Troubleshooting Guide, HP-UX 11i v3, First Edition, November 2009


Recovering the root volume after VxVM emergency startup
To recover the root volume after VxVM emergency startup
1
After you have used vx_emerg_start to start VxVM, use the vxprint command
to determine the configuration state.
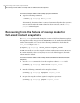
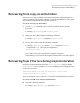
One common problem is that all the plexes of the root volume, rootvol, are
stale. This would be shown in the STATE field of the vxprint output as follows:
TYNAME ASSOC KSTATE LENGTH PLOFFS STATE ...
vrootvol root DISABLED 393216 - ACTIVE ...
plrootvol-01 rootvol DISABLED 393216 - STALE ...
sdrootdisk01-02rootvol-01 ENABLED 393216 0 - ...
plrootvol-02 rootvol DISABLED 393216 - STALE ...
sdrootdisk02-02rootvol-02 ENABLED 393216 0 - ...
(The TUTIL0 and PUTIL0 fields have been removed from the vxprint output
for readability.)
2
The root volume can usually be repaired by using the following command:
# vxvol -g bootdg -f start rootvol
If the root volume is mirrored, recovery is started. Wait until recovery
completes and the command exits. Then run the fsck command and mount
the root file system as shown here:
# fsck -F vxfs -o full /dev/vx/rdsk/bootdg/rootvol
# mkdir /tmp_mnt
# mount -F vxfs /dev/vx/dsk/bootdg/rootvol /tmp_mnt
The following form of the vx_emerg_start command combines all these
operations in a single command to recover the root volume and its mirrors,
check the root file system, and mount it:
# vx_emerg_start -m hostname
3
When you have recovered the volumes on the VxVM root disk, and performed
any other necessary repairs, reboot the system:
# reboot
Recovering from boot disk failure
Recovering a system by booting from recovery media
44