
Veritas Volume Manager 4.1 Troubleshooting Guide (HP-UX 11i v3, February 2007)

Recovery from Failure of a DCO Volume
20 VERITAS Volume Manager Troubleshooting Guide
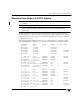
This output shows the mirrored volume, vol1, its snapshot volume, SNAP-vol1, and
their respective DCOs, vol1_dco and SNAP-vol1_dco. The two disks, mydg03 and
mydg04, that hold the DCO plexes for the DCO volume, vol1_dcl, of vol1 have failed.
As a result, the DCO volume, vol1_dcl, of the volume, vol1, has been detached and the
state of vol1_dco has been set to BADLOG. For future reference, note the entries for the
snap objects, vol1_snp and SNAP-vol1_snp, that point to vol1 and SNAP-vol1
respectively.
You can use such output to deduce the name of a volume’s DCO (in this example,
vol1_dco), or you can use the following vxprint command to display the name of a
volume’s DCO:
# vxprint [-g diskgroup] -F%dco_name volume
You can use the vxprint command to check if the badlog flag is set for the DCO of a
volume as shown here:
# vxprint [-g diskgroup] -F%badlog dco_name
This command returns the value on if the badlog flag is set. For the example output, the
command would take this form:
# vxprint -g mydg -F%badlog vol1_dco
on
Use the following command to verify the version number of the DCO:
# vxprint [-g diskgroup] -F%version dco_name
This returns a value of 0 or 20. For the example output, the command would take this
form:
# vxprint -g mydg -F%version vol1_dco
The DCO version number determines the recovery procedure that you should use:
◆ “Recovering a Version 0 DCO” on page 21
◆ “Recovering a Version 20 DCO” on page 22