
Veritas Volume Manager 4.1 Administrator's Guide (HP-UX 11i v3, February 2007)

Chapter 1, Understanding VERITAS Volume Manager
How VxVM Handles Storage Management
9
After installing VxVM on a host system, you must bring the contents of physical disks
under VxVM control by collecting the VM disks into disk groups and allocating the disk
group space to create logical volumes.
Note To bring the physical disk under VxVM control, the disk must not be under LVM
control. For more information on how LVM and VM disks co-exist or how to
convert LVM disks to VM disks, see the VERITAS Volume Manager Migration Guide
Bringing the contents of physical disks under VxVM control is accomplished only if
VxVM takes control of the physical disks and the disk is not under control of another
storage manager such as LVM.
VxVM creates virtual objects and makes logical connections between the objects. The
virtual objects are then used by VxVM to do storage management tasks.
Note The vxprint command displays detailed information on existing VxVM objects.
For additional information on the vxprint command, see “Displaying Volume
Information” on page 224 and the vxprint(1M) manual page.
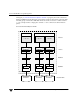
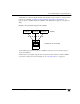
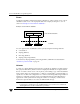
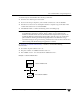
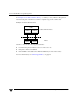
Combining Virtual Objects in VxVM
VxVM virtual objects are combined to build volumes. The virtual objects contained in
volumes are VM disks, disk groups, subdisks, and plexes. VERITAS Volume Manager
objects are organized as follows:
◆ VM disks are grouped into disk groups
◆ Subdisks (each representing a specific region of a disk) are combined to form plexes
◆ Volumes are composed of one or more plexes