
Veritas Volume Manager 4.1 Administrator's Guide (HP-UX 11i v3, February 2007)


Upgrading a Disk Group
172 VERITAS Volume Manager Administrator’s Guide
To list the version of a disk group, use this command:
# vxdg list dgname
You can also determine the disk group version by using the vxprint command with the
-l format option.
To upgrade a disk group to the highest version supported by the release of VxVM that is
currently running, use this command:
# vxdg upgrade dgname
By default, VxVM creates a disk group of the highest version supported by the release. For
example, VERITAS Volume Manager 4.1 creates disk groups with version 120.
It may sometimes be necessary to create a disk group for an older version. The default
disk group version for a disk group created on a system running VERITAS Volume
Manager 4.1 is 120. Such a disk group cannot be imported on a system running VERITAS
Volume Manager 2.3, as that release only supports up to version 40. Therefore, to create a
disk group on a system running VERITAS Volume Manager 4.1 that can be imported by a
system running VERITAS Volume Manager 2.3, the disk group must be created with a
version of 40 or less.
To create a disk group with a previous version, specify the -T version option to the vxdg
init command. For example, to create a disk group with version 40 that can be imported
by a system running VxVM 2.3, use the following command:
# vxdg -T 40 init newdg newdg01=c0t3d0
This creates a disk group, newdg, which can be imported by VERITAS Volume Manager
2.3. Note that while this disk group can be imported on the VxVM 2.3 system, attempts to
use features from VERITAS Volume Manager 3.0 and later releases will fail.
20
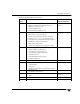
◆ Dirty Region Logging (DRL)
◆ Disk Group Configuration Copy Limiting
◆ Mirrored Volumes Logging
◆ New-Style Stripes
◆ RAID-5 Volumes
◆ Recovery Checkpointing
Features Supported by Disk Group Versions
Disk Group
Version
New Features Supported Previous Version
Features Supported