
Veritas Volume Manager 4.1 Administrator's Guide (HP-UX 11i v3, February 2007)

Chapter 2, Administering Disks
Removing and Replacing Disks
93
Replacing a Failed or Removed Disk
Note You may need to run commands that are specific to the operating system or disk
array when replacing a physical disk.
Use the following procedure after you have replaced a failed or removed disk with a new
disk:
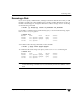
1. Select menu item 4 (Replace a failed or removed disk) from the
vxdiskadm main menu.
2. At the following prompt, enter the name of the disk to be replaced (or enter list for
a list of disks):
Replace a failed or removed disk
Menu: VolumeManager/Disk/ReplaceDisk
VxVM INFO V-5-2-479 Use this menu operation to specify a
replacement disk for a disk that you removed with the “Remove a
disk for replacement” menu operation, or that failed during use.
You will be prompted for a disk name to replace and a disk
device to use as a replacement.
You can choose an uninitialized disk, in which case the disk
will be initialized, or you can choose a disk that you have
already initialized using the Add or initialize a disk menu
operation.
Select a removed or failed disk [<disk>,list,q,?] mydg02
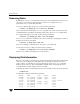
3. The vxdiskadm program displays the device names of the disk devices available for
use as replacement disks. Your system may use a device name that differs from the
examples. Enter the device name of the disk or press Return to select the default
device:
The following devices are available as replacements:
c0t1d0 c1t1d0
You can choose one of these disks to replace mydg02.
Choose "none" to initialize another disk to replace mydg02.
Choose a device, or select "none"
[<device>,none,q,?] (default: c0t1d0)
4. Depending on whether the replacement disk was previously initialized, perform the
appropriate step from the following: