
Veritas Volume Manager 4.1 Administrator's Guide (HP-UX 11i v3, February 2007)

Removing and Replacing Disks
92 VERITAS Volume Manager Administrator’s Guide
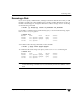
6. You can now choose whether the disk is to be formatted as a CDS disk that is portable
between different operating systems, or as a non-portable hpdisk-format disk:
Enter the desired format [cdsdisk,hpdisk,q,?] (default: cdsdisk)
Enter the format that is appropriate for your needs. In most cases, this is the default
format, cdsdisk.
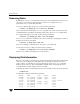
7. At the following prompt, vxdiskadm asks if you want to use the default private
region size of 2048 blocks. Press Return to confirm that you want to use the default
value, or enter a different value. (The maximum value that you can specify is 524288
blocks.)
Enter desired private region length [<privlen>,q,?] (default: 2048)
8. If one of more mirror plexes were moved from the disk, you are now prompted
whether FastResync should be used to resynchronize the plexes:
Use FMR for plex resync? [y,n,q,?] (default: n) y
vxdiskadm displays the following success message:
VxVM NOTICE V-5-2-158 Disk replacement completed successfully.
9. At the following prompt, indicate whether you want to remove another disk (y) or
return to the vxdiskadm main menu (n):
Remove another disk? [y,n,q,?] (default: n)
Note If removing a disk causes one or more volumes to be disabled, see the section,
“Restarting a Disabled Volume” in the chapter “Recovery from Hardware Failure”
in the VERITAS Volume Manager Troubleshooting Guide, for information on how to
restart a disabled volume so that you can restore its data from a backup.
If you wish to move hot-relocate subdisks back to a replacement disk, see “Configuring
Hot-Relocation to Use Only Spare Disks” on page 339.