
Veritas Volume Manager 4.1 Administrator's Guide (HP-UX 11i v3, February 2007)

Chapter 2, Administering Disks
Removing a Disk from VxVM Control
89
Removing a Disk with No Subdisks
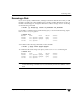
To remove a disk that contains no subdisks from its disk group, run the vxdiskadm
program and select item 2 (Remove a disk) from the main menu, and respond to the
prompts as shown in this example to remove mydg02:
Enter disk name [<disk>,list,q,?] mydg02
VxVM NOTICE V-5-2-284 Requested operation is to remove disk mydg02
from group mydg.
Continue with operation? [y,n,q,?] (default: y) y
VxVM INFO V-5-2-268 Removal of disk mydg02 is complete.
Clobber disk headers? [y,n,q,?] (default: n) y
Enter y to remove the disk completely from VxVM control. If you do not want to remove
the disk completely from VxVM control, enter n.
Removing a Disk from VxVM Control
After removing a disk from a disk group, you can permanently remove it from VERITAS
Volume Manager control by running the vxdiskunsetup command:
# /usr/lib/vxvm/bin/vxdiskunsetup c#t#d#
Caution The vxdiskunsetup command removes a disk from VERITAS Volume
Manager control by erasing the VxVM metadata on the disk. To prevent data
loss, any data on the disk should first be evacuated from the disk. The
vxdiskunsetup command should only be used by a system administrator
who is trained and knowledgeable about VERITAS Volume Manager.