
VERITAS Volume Manager 3.5 User's Guide - VERITAS Enterprise Administrator (September 2004)

Disk Tasks
Reserving a Disk
Chapter 356
Reserving a Disk
The Set Disk Usage feature can be used to designate a disk as a
reserved disk. A reserved disk is not considered part of the free space
pool. If you perform a task that requires disk space and you do not
specify a disk, VxVM allocates space from disks other than the reserved
disk.
To reserve a disk
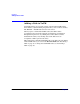
Step 1. Follow the instructions in “Adding a Disk to VxVM” on page 52 to place
the disk under VxVM control and in a dynamic disk group.
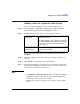
Step 2. Select the disk to be reserved.
Step 3. Choose Action > Set Disk Usage.
Step 4. In the Set Disk Usage window, check the Reserve Disk option. Click OK.
(To cancel the disk reservation, open the Set Usage window, and uncheck
the Reserve Disk option.)
NOTE
• Before you select the Reserve Disk option, make sure the disk is
under VxVM control and in a dynamic disk group.
• A reserved disk is not available for general use.
• A reserved disk can only be used if you specify the reserved disk
when you perform a task.