
VERITAS Volume Manager 3.5 User's Guide - VERITAS Enterprise Administrator (September 2004)

Disk Tasks
Adding a Disk to a Dynamic Disk Group
Chapter 3 53
Adding a Disk to a Dynamic Disk Group
Select the uninitialized disk to be placed under VxVM control.
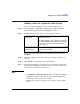
Step 1. Choose Actions > Add Disk to Dynamic Group. The Add Disk to
Dynamic Group wizard appears. Click Next to continue.
Step 2. Complete the Add Disk to Dynamic Group wizard as follows:
When you have provided all necessary information in the dialog box,
click Next.
Step 3. When the confirmation dialog box appears, click Yes to confirm your
selection.
Step 4. Click Finish to add the disk to the selected group.
Step 5. If your system supports encapsulation, you now indicate whether the
disk should be initialized or encapsulated. (It is necessary to reboot the
system before encapsulation takes effect.)
NOTE
• The Add Disk to Dynamic Group task sets up disks for VxVM use.
Disks must be under VxVM control and in a dynamic disk group
before they can be used to create volumes.
• Disks must be online before they can be added to a dynamic disk
group.
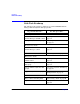
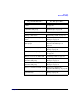
Dynamic disk
group name:
Select the dynamic disk group into which the
disks will be added.
To add the disk(s) to a new dynamic disk group,
select New dynamic disk group, and enter the
name of the new dynamic disk group in the
new dialog box.
Available disks:
Selected disks:
Move the disks to be added from Available
disks to Selected disks.