
VERITAS Volume Manager 3.5 User's Guide - VERITAS Enterprise Administrator (September 2004)

Getting Started with VxVM VEA
Viewing Objects and Object Properties
Chapter 230
• To display all of the subdisks and gaps on all disks, choose View >
Expand All. To hide all of the subdisks and gaps on all disks, choose
View > Collapse All.
• To use the statistics collection feature, see “Viewing Real-Time
Statistics” on page 41.
• To highlight a disk row, click on the disk name. To highlight a volume
column, click on the volume name. To highlight both the disk and
volume associated with a particular circle, click on the circle.
• Volumes with relatively slow read/write performance are shown as
circular red icons.
• To change the criteria that determine which disks are displayed as
slow performers, see “Monitoring Performance” on page 42.
• To print the properties of a particular object, select the object and
then choose File > Print and complete the Print dialog box.
Mapping Volumes to Disks
You can map a plex to the associated disk by bringing up both the
Volume View and the Disk View. When you click on the plex in the
Volume View, the corresponding disk in the Disk View is highlighted.
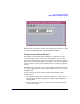
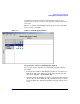
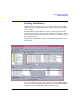
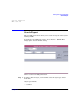
Object Properties Window
The Object Properties window contains detailed information about the
selected object. The Properties window contains a set of tabbed pages,
each of which contains information about the object and related objects.
The tab labels and page contents vary, depending on the type of object
selected. You can display a different page by clicking on the appropriate
tab label. Some object properties can be changed through the Properties
window for the object. For instructions on navigating the Object
Properties window, see “Navigating the Object Properties Window” on
page 31.
Figure 2-2, “Volume Properties Window,” shows how a volume appears in
the Volume Properties window.