
VERITAS Volume Manager 3.5 User's Guide - VERITAS Enterprise Administrator (September 2004)


Cluster Tasks
Importing a Shared Dynamic Disk Group
Chapter 6186
Importing a Shared Dynamic Disk Group
The Import Dynamic Disk Group procedure makes a deported
(inaccessible) shared dynamic disk group and its volumes accessible
again. To import a deported dynamic disk group, you must know the
former name of the dynamic disk group, and this name must not be in
use. In addition, at least one disk name formerly assigned to the
deported dynamic disk group must not be in use.
To import a shared dynamic disk group
Step 1. Select the appropriate host machine node.
Step 2. Choose Actions > Import Dynamic Disk Group.
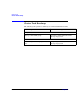
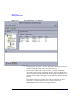
Step 3. Complete the Import Dynamic Disk Group dialog box as follows:
When you have provided all necessary information in the dialog box,
click OK.
NOTE
New Name: Enter a new dynamic disk group name in the New Name
field. to change the name of the dynamic disk group at
import.
Clear host ID Select Clear host ID to clear the existing host ID
stamp on all disks in the dynamic disk group at import,
Do not use this option if another host is using any disks
in the dynamic disk group.
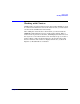
Force Select Force to force the dynamic disk group import
when the host cannot access all disks in the dynamic
disk group This option can be used to import a dynamic
disk group that contains a failed disk, but can lead to
dynamic disk group inconsistency if all disks are still
usable.
Import Shared Select Import Shared to import the dynamic disk group
as a shared dynamic disk group, This option is only
applicable in a cluster environment.