
VERITAS Volume Manager 3.5 User's Guide - VERITAS Enterprise Administrator (June 2002)

Evacuating a Disk
44 VERITAS Volume Manager User’s Guide - VEA
Evacuating a Disk
This feature is similar to disk replacement, but it involves moving the contents of the
volumes on one dynamic disk to another dynamic disk. If a disk begins to fail, you can
attempt toprotect/preserve thevolumes onthat disk by evacuating the disk. You can also
evacuate a disk if you plan to remove the disk or use the disk elsewhere. The other
dynamic disk does not have to be empty. The active redundant volumes on the
replacement disk will be synchoronized automatically.
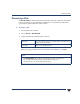
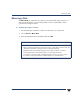
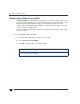
To Evacuate a disk:
1. Right click on the disk you wish to evacuate.
2. Select Evacuate Disk.
3. The Evacuate Disk dialog will appear. Select either “Auto Assign destinations disks”
or “Manually assign destination disks”.
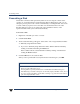
a. If you chose “Manually assign destination disks” add the destination disks by
clicking on the disk and clicking the Add button.
Remove disks from the selected destination disks by clicking on the disk and
clicking the Remove button.
4. Click the OK button to Evacuate the disk.
When you have provided all necessary information in the dialog box, click OK.
Notes:
◆ The contents of a disk must be evacuated/moved to another disk in the same dynamic
disk group with sufficient free space.
◆ If no target disk is specified, VxVM uses an available disk with sufficient free space.
◆ If the diskbeing evacuated contains partof a mirrored, striped,or RAID-5 volume, donot
move the contentsof thedisk to another diskcontaining acopy of the mirrored volumeor
part of the striped/RAID-5 volume.