
VERITAS Volume Manager 3.5 User's Guide - VERITAS Enterprise Administrator (June 2002)


Adding a Disk to VxVM
38 VERITAS Volume Manager User’s Guide - VEA
Adding a Disk to VxVM
New disks must be set up on the system, placed under VxVM control, then added to a
dynamic disk group before they can be used for volumes. The Actions > Rescan task
scans for new devices.
When you place a disk under VxVM control, the disk is either encapsulated (if your
system supports encapsulation) or initialized. Encapsulation preserves any existing data
on the disk in volumes. Initialization destroys any existing data on the disk. (You can
encapsulate a disk to preserve the data.)
This task assigns a default VxVM disk name to the disk. Once the disk is under VxVM
control, you can use the Rename Disk task (Renaming a Disk) to change the VxVM disk
name (see “Renaming a Disk” on page 41).
Adding a Disk to a Dynamic Disk Group
Select the uninitialized disk to be placed under VxVM control.
1. Choose Actions > Add Disk to Dynamic Group. The Add Disk to Dynamic Group
wizard appears. Click Next to continue.
2. Complete the Add Disk to Dynamic Group wizard as follows:
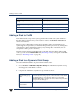
Temporarily prevent access to a dynamic disk
group
Deporting Dynamic Disk Groups
Restore access to a deported dynamic disk
group
Importing Dynamic Disk Groups
Remove a disk from VxVM control Removing a Disk from a Dynamic Disk Group
Destroy a dynamic disk group (permanently) Destroying a Dynamic Disk Group
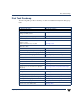
To perform this task … Use this procedure …
Dynamic disk group
name:
Select the dynamic disk group into which the disks will be added.
To add the disk(s) to a new dynamic disk group, select New
dynamic disk group , andenter the nameof the newdynamic disk
group in the new dialog box.
Available disks:
Selected disks:
Move the disks to be added from Available disks to Selected disks.