
VERITAS Volume Manager 3.5 User's Guide - VERITAS Enterprise Administrator (June 2002)


Chapter 5, File System Tasks 121
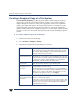
Adding a New File System to a Volume
Adding a New File System to a Volume
You can use the Volume Manager New File System procedure to place a file system onto
an existing volume and mount the file system. This also updates the file system table file,
if necessary.
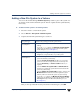
▼ To add a new file system to an existing volume
1. Select the volume to contain the file system.
2. Choose Actions > File System > New File System.
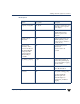
3. Complete the New File System dialog box as follows:
After you have provided all necessary information in the dialog box, click OK.
File system type: Select the file system type from the options shown.
Create Options:
- See Allocation Unit/Block size for allocation and block and
settings.
- To specify create details, click New File System Details
and specify any additional options in the New File System
Details dialog box (see Create Options).
Compress (checkbox)
- If your platform supports file compression, then you can select
Compress to compress the files on your file system.
Mount Options:
- Enter the mount point for the file system, if you want the file
system mounted at system startup.
- Select the Create mount point checkbox if you want the
system to create the mount point if it does not already exist.
- Select the Read only and Honor setuid checkboxes, as
required.
- Select the Add to file system table and Mount at boot
checkboxes to update the system table file and mount the file
system at system startup.
- Select the Add to file system table checkbox, and leave the
Mount at boot checkbox unselected to update the system
table file, and not mount the file system at system startup.
- To specify mount details, click Mount File System Details
and specify any additional options using the checkboxes and
Extra Options entry in the Mount Details dialog box (see
Mount Options).