
VERITAS Volume Manager 3.5 User's Guide - VERITAS Enterprise Administrator (June 2002)


Chapter 4, Volume Tasks 113
Moving, Splitting, and Joining Subdisks
Moving a Subdisk
Note You are not allowed to move a subdisk that is part of a boot or system volume.
The Subdisk Move procedure moves the contents of a volume subdisk from one disk to
another. This is useful for moving portions of a volume to a different disk for improved
performance.
If disk activities are heavily concentrated on one or a small number of disks in the storage
subsystem, it may create bottlenecks. You can use the Subdisk Move and possibly the
Subdisk Split command to spread out disk accesses more evenly across all the disks to
balance the load.
You can use the Subdisk Move command to move all subdisks to healthier disks. The
benefit of moving subdisks instead of copying the volumes is that you need only enough
space onthe receivingdisks for the subdiskson the onefailed disk, not forentire volumes
that may span multiple disks. Another advantage is that there is no interruption in I/O.
Moving subdisks provides you with a flexible means of making adjustments in your
storage system while it is up and running.
▼ To perform a subdisk move operation:
You can use the Object View window (Disk Groups > Object View) or the Volume to
Disk Mapping window (Disk Groups > Disk/Volume Map) to view the subdisks and
gaps ondisks ina disk group. Inthe ObjectView window, you can move asubdisk by
placing the pointer over the subdisk and then pressing and holding the mouse button
to drag the subdisk to another location.
To display the subdisk in the right pane, click on its volume in the tree view, and then
click on the Subdisks tab in the right pane. The subdisks for that volume will display.
You can use theSubdisksPropertiescommandto furtheridentify thecharacteristics of
a volume’s subdisks.
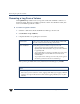
1. Identify the subdisk that you want to move and display it in the right pane.
Right-click on the subdisk you want to move to bring up its context menu.
2. Select Move from the context menu.
3. The welcome screen of the Subdisk Move wizard appears. Click Next to continue.
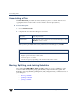
4. In the screen that appears next, choose either automatic or manual selection of the
destination disk for the subdisk to be moved and click Next.
Leave the default value of“Auto assigndestination disks”if youwant theprogramto
assign the destination disk.
If you want to select the destination disk, click “Manually assign destinations disks.