
VERITAS Volume Manager 3.5 User's Guide - VERITAS Enterprise Administrator (June 2002)


Changing a Volume Layout
94 VERITAS Volume Manager User’s Guide - VEA
Changing a Volume Layout
The volume Change Layout procedure changes the layout of a volume without
interrupting access to data. You can use this task to change the redundancy or
performance characteristics of an existing volume.
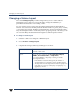
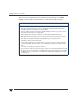
You can view the progress of the relayout task through the Relayout Status Monitor
window. You can also use the Relayout Status Monitor window to pause, abort, continue,
or reverse the relayout task. The Relayout Status Monitor appears automatically when a
relayout task begins. When a volume relayout is in progress, paused, or aborted, you can
also access the Relayout Status Monitor through the Volume Properties window.
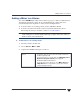
▼ To change a volume layout
1. Select the volume to be changed to a different layout.
2. Choose Actions > Change Layout.
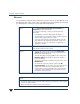
3. Complete the Change Volume Layout dialog box as follows:
Volume Name: If the correct volume name does not already display in this field,
enter the volume name.
Layout: Choose the new volume layout (
Concatenated, Striped,
RAID-5, Concatenated Pro, or Striped Pro.)
For a striped, RAID-5, or striped pro volume, provide the
following information:
- In the Number of Columns field, specify the number of
columns (disks) across which the volume should be striped.
- The stripeunit sizein theStripeUnit Sizefield.To specifya size
unit, attach an s (sectors), k (kilobytes), m (megabytes), or g
(gigabytes) to the size.