
VERITAS Volume Manager 3.5 Installation Guide (September 2004)


Upgrading the VERITAS Volume Manager
Supported Upgrade Scenarios
Chapter 4
51
Step 5. Reboot from your new VxVM root disk. If you created a mirrored root disk, then there is nothing more
to do. The LVM root disk can now safely co-exist with your VxVM root disk, giving you an
emergency backup boot target.
Step 6. If you wish, you can convert your original LVM root disk into a mirror of your VxVM root disk using
the following commands:
# /etc/vx/bin/vxdestroy_lvmroot -v c2t0d0
# /etc/vx/bin/vxrootmir -v c2t0d0
Once this operation is complete, you will be running on a completely mirrored VxVM root disk.
Step 7. If you later choose to return to an LVM root, you can use the vxres_lvmroot (1M) command to restore
the LVM root disk.
Upgrade Scenarios
Three upgrade scenarios are considered; these include upgrading with, and without, VxVM
rootability:
Step 1. Upgrade from a prior version of HP-UX 11.22 LVM rootable system, with VxVM configured, to
HP-UX 11i v2 LVM rootable system with VxVM 3.5.
Step 2. Upgrade from a prior version of HP-UX 11.22 LVM rootable system, with VxVM configured, to
HP-UX 11i v2 VxVM rootable system with VxVM 3.5.
Step 3. Upgrade from HP-UX 11.22 LVM rootable system with VxVM 3.1 to HP-UX 11i v2 LVM rootable
system with VxVM 3.5.
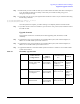
Table 4-2 Rootability Upgrade Paths
If Your Current
Configuration is ...
... And You
Want to
Upgrade to ...
... Then You Need
to ...
Refer to
Scenario 1 HP-UX 11.22 LVM
rootable, with VxVM
3.1 configured
HP-UX 11i v2
LVM rootable
with VxVM 3.5
Upgrade using the
HP-UX 11i v2 CD.
VxVM 3.5 is
installed by default
“VxVM Not
Controlling
the Root
Disk” on
page 3
Scenario 2 HP-UX 11.22 LVM
rootable with VxVM
3.1 configured
HP-UX 11i v2
VxVM rootable
with VxVM 3.5
Upgrade using the
HP-UX 11i v2 CD.
“Installing
VERITAS
Volume
Manager” on
page 25
Scenario 3 An HP-UX 11.22
VxVM rootable
HP-UX 11i v2
VxVM rootable
with VxVM 3.5
Upgrade using the
HP-UX 11i v2 CD