
VERITAS Volume Manager 3.5 Installation Guide (September 2004)


Upgrading the VERITAS Volume Manager
Supported Upgrade Scenarios
Chapter 4
50
Supported Upgrade Scenarios
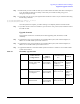
If you are already running a previous version of VxVM, you can upgrade to VxVM 3.5. In some cases,
you do not have to do a complete removal of the old VxVM packages.
With the release of VxVM 3.5, you also have the choice of having your root disk placed under VxVM
control. With this in mind, the following upgrade procedures are broken down into:
• Procedures needed to upgrade to the VxVM 3.5 release from the VxVM and HP-UX release that
you are currently running.
• Procedures needed to upgrade to the VxVM 3.5 release from the VxVM and HP-UX release that
you are currently running, plus putting the root disk under VxVM control.
Upgrading to a VxVM Root Disk
With the advent of the HP-UX 11i AR0902 release, it is now possible to select VxVM as a choice for
your root disk when performing a new installation using Ignite-UX. However, if you are a current
HP-UX user, and you are performing an upgrade from a prior release of HP-UX, or if you are a current
HP-UX user also running a prior release of VxVM, you cannot invoke Ignite-UX to convert your
system to be VxVM rootable. You can use the following procedure to achieve VxVM rootability by
cloning your LVM root disk using the vxcp_lvmroot (1M) command.
Step 1. Upgrade your system to HP-UX 11i v2 if your current version of HP-UX and/or VxVM is not already
at this level.
Step 2. Select the disk to be used as your new VxVM root disk. It is recommended, that this disk is internal to
the main computer cabinet. If this is currently an LVM disk, then it must be removed from LVM
control (see “Preparing to Install VxVM on a System with LVM Volume Groups” on page 11). If you
have two spare disks, and you want to set up a mirrored root disk, make sure that the second disk is
also free from LVM control.
Step 3. While booted on the newly upgraded LVM root disk, invoke the vxcp_lvmroot command to clone the
LVM root disk to the disk(s) you have designated to be the new VxVM root disk(s). In the following
examples, c1t0d0 and c2t0d0 are used for the target VxVM root disk and the (optional) root mirror.
# /etc/vx/bin/vxcp_lvmroot -v c1t0d0
or; for a mirrored root:
# /etc/vx/bin/vxcp_lvmroot -v -m c2t0d0 c1t0d0
The-v option is highly recommended. The cloning of the root disk is a lengthy operation, and the -v
option gives a time-stamped progress indication as each volume is copied, and other major events.
NOTE The vxcp_lvmroot command checks the OS revision number, and will not allow upgrade to proceed
unless the OS revision is at the required level.
Step 4. You can use the setboot (1M) command to save the hardware path of the new VxVM root disk in the
system NVRAM. The disk hardware paths can be found using the command:
# ioscan -kfnC disk