
VERITAS Volume Manager 3.5 Installation Guide (August 2002)


Chapter 4, Upgrading the VERITAS Volume Manager
Supported Upgrade Scenarios
53
The-v option is highly recommended. The cloning of the root disk is a lengthy
operation, and the -v option gives a time-stamped progress indication as each
volume is copied, and other major events.
Note The vxcp_lvmroot command checks the OS revision number, and will not allow
upgrade to proceed unless the OS revision is AR0902 or greater.
4. You can use the setboot (1M) command to save the hardware path of the new
VxVM root disk in the system NVRAM. The disk hardware paths can be found using
the command:
# ioscan -kfnC disk
5. Reboot fromyour newVxVM rootdisk. Ifyou createda mirroredrootdisk, thenthere
is nothing more to do. The LVM root disk can now safely co-exist with your VxVM
root disk, giving you an emergency backup boot target.
6. If you wish, you can convert your original LVM root disk into a mirror of your VxVM
root disk using the following commands:
# /etc/vx/bin/vxdestroy_lvmroot -v c2t0d0
# /etc/vx/bin/vxrootmir -v c2t0d0
Once thisoperation is complete, you willbe runningon a completely mirrored VxVM
root disk.
7. If you later choose to return to an LVM root, you can use the vxres_lvmroot (1M)
command to restore the LVM root disk.
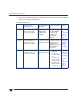
Upgrade Scenarios
Three upgrade scenarios are considered; these include upgrading with, and without,
VxVM rootability:
1. Upgrade from a prior version of HP-UX 11i LVM rootable system, with VxVM
configured, to HP-UX 11i AR0902 LVM rootable system with VxVM 3.5.
2. Upgrade from a prior version of HP-UX 11i LVM rootable system, with VxVM
configured, to HP-UX 11.11i VxVM rootable system with VxVM 3.5.