
VERITAS Volume Manager 3.5 Installation Guide (August 2002)

Using vxinstall
44 VERITAS Volume Manager Installation Guide
- Custom Installation allowsyou to initialize disksin adisk array, evenif valid data
exists on those disks. Avoid selecting the initialize option for any disks that
contain valid data.
Note vxinstall shows default responses in parentheses; to choose the default, press
Return. You can quit the initialization at any time by typing q at any of the
vxinstall prompts. Disks are initialized at the end of the vxinstall procedure.
If you quit vxinstall before it initializes the disks, all disks are left as they were
before vxinstall was started.
To use the Custom Installation option, perform the following procedure:
1. Select menu item 2 (Custom Installation) from the vxinstall main menu.
The vxinstall program asks you a series of questions for each disk array and disk
connected to your system. To accept a default response displayed in parentheses,
press Return.
Note At any of the vxinstall prompts, you can select q to completely abandon the
initialization and start over.
2. The vxinstall program now goes through each disk array and asks you how to
handle the disks contained on that disk array. The vxinstall program begins this
process for each disk array by identifying the controller and generating a list of its
disks.
If any disks are listed in the /etc/vx/disks.exclude or
/etc/vx/cntrls.exclude or /etc/vx/enclr.exclude file, they are listed
here separately as excluded disks.
3. Press Return to continue.
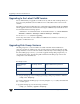
4. Indicate how you want the disks on this disk array to be handled at the following
prompt:
Installation options for enclosure enc0
Menu: VolumeManager/Install/Custom/enc0
1 Install all disks as new disks.(discards data on disks!)
2 Install one disk at a time.
3 Leave these disks alone.
? Display help about menu
?? Display help about the menuing system
q Exit from menus
Select an operation to perform: