
VERITAS Volume Manager 3.2 for HP-UX Release Notes

VERITAS Volume Manager 3.2 for HP-UX Release Notes
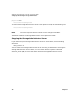
Initializing the VERITAS Volume Manager for HP-UX
Chapter 162
NOTE As this example continues, vxinstall summarizes your choices.
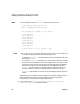
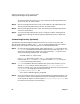
Volume Manager Custom Installation
Menu: VolumeManager/Install/Custom
The following is a summary of your choices.
c0t5d0 New Disk
c1t0d0 New Disk
c1t1d0 New Disk
c1t2d0 New Disk
c2t2d3 New Disk
c3t0d0 New Disk
c3t1d0 New Disk
c3t2d0 New Disk
Is this correct [y,n,q,?] (default: y) y
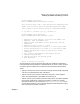
NOTE This is your last chance to review and alter your choices for how to handle any
of the disks to be placed under Volume Manager control.
If you enter y, vxinstall initializes (destroying any existing data) all disks
listed with New Disk.
If you enter n, vxinstall prompts you for the name of a disk to be removed
from the list and excluded from Volume Manager control. To remove a disk
from the list, enter the name of the disk to be removed and press
<Return>.
Repeat for each disk to be removed and then press
<Return> once more.
vxinstall will then display an updated summary without the disks you
chose for removal. If you are now satisfied with the summary, enter y.
vxinstall responds with a summary of the reconfigured system (partition
phase).
Depending on your input during this procedure, you may be requested to shut
down and reboot your machine. If this happens, shut down and reboot
immediately or at the earliest convenient opportunity.
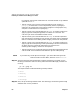
c. If you select option 3, Prevent Multipathing/Suppress devices from
VxVM’s view, vxinstall proceeds as follows: