
VERITAS Volume Manager 3.1 Storage Administrator Administrator's Guide

Host and Cluster Tasks
Creating a Shared Disk Group
Chapter 5 223
Creating a Shared Disk Group
This procedure creates a shared disk group for use in a cluster
environment. Disks must be placed in disk groups before they can be
used by the Volume Manager. The default disk group (rootdg) is usually
created during Volume Manager installation and always exists on a
system running the Volume Manager. You can create additional disk
groups to organize your disks into logical sets of disks.
When you place a disk under Volume Manager control, the disk is
initialized. Initialization destroys any existing data on the disk.
To create a disk group
Step 1. Select the host machine that is the master node.
Step 2. Choose File > New > Disk Group (menu) or Disk Group Create
(Command Launcher).
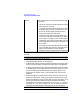
Step 3. Complete the New Disk Group dialog box as follows:
Disk Group Name: Type the name of the disk group to be created.
Click View to view the names of existing disk
groups.
To set up any new disks on the system, click Scan
Disks. This runs the disk setup commands
appropriate for the operating system.
Disk Device(s): Select the disk(s) to be placed in the new disk
group.
Cluster Settings Click Show Options to access the optional settings
for this task. Select Create Shared to create a
shared disk group.