
VERITAS Volume Manager 3.1 Storage Administrator Administrator's Guide


Volume Tasks
Removing a Mirror From a Volume
Chapter 4 183
Removing a Mirror From a Volume
NOTE Removing a mirror can result in loss of data redundancy.
This procedure removes a mirror from its volume. This breaks the link
between the mirror and its volume and returns the mirror’s disk space to
the free space pool for reuse. You can remove an extra mirror from a
volume to make the underlying disk space available for use elsewhere.
However, this may leave the volume unmirrored and unprotected against
disk failure.
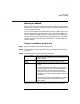
To remove a mirror from a volume
Step 1. Select the volume that contains the mirror to be removed.
Step 2. Choose Volumes > Mirror > Remove (Selected menu) or Mirror Remove
(Command Launcher).
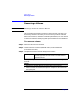
Step 3. Complete the Remove Mirror dialog box as follows:
Volume Name: If the correct volume name is not already displayed in
this field, type the volume’s name or click Browse to
select the volume.
Removal Method: Specify the mirrors and/or number of mirrors to be
removed:
• To specify how many mirrors should be removed,
select By Quantity/disk. Type the number of
mirrors to be removed in the Mirror Quantity field.
• To specify the disk(s) on which mirrors should be
preserved, select By Quantity/disk. Type the disk
name(s) in the Preserved Disk(s) field or click
Browse to select a disk.
• To specify the name of the mirror to be removed,
select By Mirror. Type the mirror name in the
Mirror Name field or click Browse to select a
mirror.