
VERITAS Volume Manager 3.1 Storage Administrator Administrator's Guide


Volume Tasks
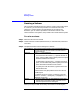
Changing a Volume’s Layout
Chapter 4 167
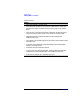
When you have provided all necessary information in the dialog box,
click OK. The Relayout Status Monitor window appears. This window
provides you with the following information and options:
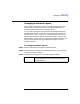
If you need to pause, abort, continue, or reverse a relayout task after you
close the Relayout Status Monitor window, you can access the Relayout
Status Monitor through the Volume Properties window.
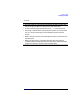
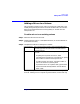
Options Click Show Options to access the optional settings for
this task.
• To retain the original volume size when the volume
layout changes, click Retain Volume Size at
Completion.
• To specify the size of the pieces of data that are
copied to temporary space during the volume
relayout, type the size in the Temp Space Size field.
• To specify additional disk space to be used for the
new volume layout (if needed), specify the disk in the
Disk(s) field or click Browse to select a disk.
• To specify the temporary disk space to be usedduring
the volume layout change, specify the disk in the
Temp Disk(s) field or click Browse to select a disk.
• If the volume contains plexes with different layouts,
specify the plex to be changed to the new layout in
the Target Plex field.
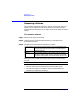
Volume Name: The name of the volume that is undergoing a layout
change.
Initial Layout: The original layout of the volume.
Desired Layout: The new layout for the volume.
Status: The status of the relayout task.
% Complete: The progress of the relayout task.
Options • To stop the relayout task temporarily, click Pause.
• To cancel the relayout task, click Abort.
• To resume the paused or aborted relayout task, click
Continue.
• To undothe layout changes and return the volume to
its original layout, click Reverse.