
VERITAS Volume Manager 3.1 Storage Administrator Administrator's Guide


Volume Tasks
Resizing a Volume
Chapter 4162
Resizing a Volume
This procedure changes the size of a volume. If users require more space
on a volume, you can use this procedure to increase the size of the
volume. If a volume contains unused space that you need to use
elsewhere, you can use this procedure to shrink the volume. If the
volume contains a file system, this procedure also resizes the file system.
To resize a volume
Step 1. Select the volume to be resized.
Step 2. Choose Volumes > Resize (Selected menu) or Volume Resize (Command
Launcher).
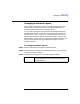
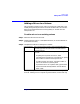
Step 3. Complete the Resize Volume dialog box as follows:
When you have provided all necessary information in the dialog box,
Volume Name: If the correct volume name is not already displayed in
this field, type the volume’s name or click Browse to
select the volume.
New Size: Specify
one
of the following:
• To increase the volume size
by
a specific amount of
space, use the Add By field tospecify how much space
should be added to the volume.
• To decrease the volume size
by
a specific amount of
space, use the Subtract By field to specify how much
space should be removed from the volume.
• To specify the new volume size, type the size in the
Desired Size field.
To determine the largest possible size for the volume,
click Maxgrow.
The default size unit is sectors. To specify a size unit,
attach an s (sectors), k (kilobytes), m (megabytes), or g
(gigabytes) to the size.
Options • To use a specific disk for the additional space, click
Assign Disks and select the disk you want to use
from the Space Allocation dialog box.