
VERITAS Volume Manager 3.1 Storage Administrator Administrator's Guide

Disk Tasks
Destroying a Disk Group
Chapter 3140
Destroying a Disk Group
CAUTION Destroying a disk group can result in data loss.
This procedure
permanently
removes a disk group from Volume
Manager control. This also reinitializes all of the disks in the disk group
as empty disks and places them in the free disk pool for reuse.
You should only destroy a disk group if you are sure that you no longer
need the volumes and data in the disk group. Since the last disk in a disk
group cannot be removed, destroying a disk group is useful for freeing
the last disk in a disk group for reuse.
To destroy a disk group
Step 1. Select the appropriate host machine node.
Step 2. Choose Hosts > Destroy Disk Group (Selected menu) or Disk Group
Destroy (Command Launcher).
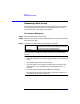
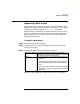
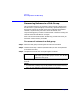
Step 3. Complete the Destroy Disk Group dialog box as follows:
When you have provided all necessary information in the dialog box,
click OK.
Disk Group Name:Type the name of the disk group to be destroyed or
click Browse to select the disk group.
Notes:
• Destroying a disk group permanently removes the disk group from
Volume Manager control and can result in data loss. This task should
be used with caution.
• When a disk group is destroyed, its disks are returned to the free disk
pool. Any volumes in the disk group are removed.
• The rootdg disk group cannot be destroyed.
• A disk group cannot be destroyed if any volumes in that disk group
are in use (open) and/or contain mounted file systems.