
VERITAS Volume Manager 3.1 Storage Administrator Administrator's Guide


Disk Tasks
Removing a Disk
Chapter 3122
Removing a Disk
This procedure removes a disk from its disk group and either places the
disk in the free disk pool or removes the disk from Volume Manager
control. If the disk is returned to the free space pool, the disk must be
added to a disk group before it can be used for volumes (see “Adding a
Disk to the Volume Manager”).
If the disk to be removed contains volumes, you must evacuate the disk
before you remove the disk.
To remove a disk from a disk group or Volume
Manager
Step 1. Select the disk to be removed.
Step 2. Choose Disks > Remove (Selected menu) or Disk Remove (Command
Launcher).
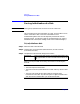
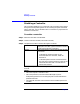
Step 3. Complete the Remove Disk dialog box as follows:
When you have provided all necessary information in the dialog box,
Disk Name(s): If the correct disk name is not already displayed in
this field, type the disk’s name or click Browse to
select the disk.
Select a
destination for the
disks:
Specify where to place the disk after removal:
• To remove the disk from its disk group and place it
in the free disk pool, select Free Disk Pool. The
disk will remain under Volume Manager control.
• To remove the disk from Volume Manager control,
select Uninitialized State.