
VERITAS Volume Manager 3.1 Storage Administrator Administrator's Guide

Disk Tasks
Unrelocating a Disk
Chapter 3 119
Unrelocating a Disk
This procedure moves relocated subdisks back to their original disk.
When a disk fails, the hot-relocation feature attempts to move subdisks
from the failed disk to other disks. The Unrelocate Disk task can be used
to return the relocated subdisks to their original disk locations after the
original disk is repaired or replaced.
To move relocated subdisks back to a disk
Step 1. Select the disk that contained the subdisks before hot-relocation.
Step 2. Choose Disks > Unrelocate (Selected menu) or Disk Unrelocate
(Command Launcher).
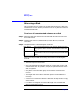
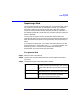
Step 3. Complete the Unrelocate Disk dialog box as follows:
When you have provided all necessary information in the dialog box,
Disk Name: If the original disk name is not already displayed in this
field, type the disk’s name or click Browse to select the
disk. This is the disk that contained the subdisks before
they were relocated.
Options • To view subdisks that were relocated by the
hot-relocation feature, click View Relocations.
• To move the relocated subdisks to a disk other than
the original disk, specify an alternate disk in the
Alternate Destination Disk field.
• To move the subdisks back to their original locations
on the original disk, click Use Exact Offsets. If the
original locations are not available, it may be
necessary to turn off this option so that the subdisks
can be moved to any available space on the disk.