
VERITAS Volume Manager 3.1 Storage Administrator Administrator's Guide

Disk Tasks
Replacing a Disk
Chapter 3 117
Replacing a Disk
This procedure replaces an existing disk with a new physical disk, moves
any volumes to the new disk, and attempts to recover any redundant
(mirrored or RAID-5) volumes on the disk. Non-redundant volumes
cannot be recovered and should be restored from backup, if possible. If
the disk being replaced is a boot disk, this procedure also sets up the new
disk as a boot disk.
You may need to replace a disk if the disk fails and/or needs to be
removed and repaired. You can use this task to reconnect a disk that has
been disconnected in preparation for replacement (see “Disconnecting a
Disk”).
If you replace a healthy disk, you need to remove the disk from its disk
group and place it in the free disk pool
before
you replace the disk (see
“Removing a Disk”). If the disk to be replaced has failed and is
disconnected, you do not need to remove the disk.
To replace a disk
Step 1. Select the disk to be replaced.
Step 2. Choose Disks > Replace (Selected menu) or Disk Replace (Command
Launcher).
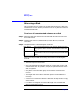
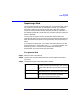
Step 3. Complete the Replace Disk dialog box as follows:
When you have provided all necessary information in the dialog box,
Disk Name: If the correct disk name is not already displayed in
this field, type the Volume Manager disk name for
the disk to be replaced or click Browse to select the
disk.
New Physical Disk: Type the physical disk name for the new
(replacement) disk or click Browse to select a disk.
Options To set up any new disks on the system, click Scan
Disks. This runs the disk setup commands
appropriate for the operating system.