
VERITAS Volume Manager 3.1 Storage Administrator Administrator's Guide

Disk Tasks
Evacuating a Disk
Chapter 3 115
Evacuating a Disk
This procedure moves the contents of the volumes on a disk to another
disk. If a disk begins to fail, you can attempt to protect/preserve the
volumes on that disk by evacuating the disk. You can also evacuate a
disk if you plan to remove the disk or use the disk elsewhere.
To evacuate a disk
Step 1. Select the disk that contains the objects and data to be moved to another
disk.
Step 2. Choose Disks > Evacuate (Selected menu) or Disk Evacuate (Command
Launcher).
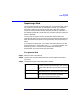
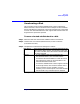
Step 3. Complete the Evacuate Disk dialog box as follows:
When you have provided all necessary information in the dialog box,
click OK.
Disk Name: If the correct disk name is not already displayed in this
field, type the disk’s name or click Browse to select the
disk.
Options To specify the disk(s) to which the contents of the
evacuated disk should be moved, click the Browse button
next to the Target Disk(s) field and select a disk.
Notes:
• This task requires a disk name.
• The contents of a disk must be evacuated/moved to another disk(s) in
the same disk group with sufficient free space.
• If no target disk is specified, the Volume Manager will use an
available disk(s) with sufficient free space.
• If the disk being evacuated contains part of a mirrored, striped, or
RAID-5 volume, the contents of the disk should not be moved to
another disk containing a copy of the mirrored volume or part of the
striped/RAID-5 volume.