
VERITAS Volume Manager 3.1 Storage Administrator Administrator's Guide

Disk Tasks
Designating a Disk as a Hot-Relocation Spare
Chapter 3 109
Designating a Disk as a Hot-Relocation Spare
This procedure adds a disk to the pool of spare disks available to the
hot-relocation feature. If an I/O failure occurs, hot-relocation
automatically relocates any redundant (mirrored or RAID-5) subdisks to
spare disks and restores the affected Volume Manager objects and data.
The system administrator is notified of the failure and relocation details
via electronic mail. After successful relocation, you may want to replace
the failed disk (see “Replacing a Disk”).
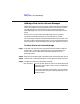
To designate a disk as a hot-relocation spare
Step 1. Follow the instructions in “Adding a Disk to the Volume Manager” to
place the disk under Volume Manager control and in a disk group.
Step 2. Select the disk to be designated as a hot-relocation spare.
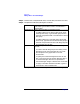
Step 3. Choose Disks > Properties (Selected menu).
Step 4. In the Disk Properties window, go to the General tab and select Spare.
Click OK.
If you decide that you want to remove the disk from the pool of
hot-relocation spares, open the Disk Properties window and click Spare
again.
Notes:
• The disk must be under Volume Manager control and in a disk group.
• Any disk in the same disk group can use the spare disk.
• To make sure that sufficient space is available for relocation, try to
provide at least one hot-relocation spare disk per disk group.