
Veritas Storage Foundation 5.1 SP1 Cluster File System Installation Guide (5900-1510, April 2011)


To upgrade in a clustered environment when FastResync is set
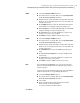
1
You should run this procedure from the master node; to find out if you are
on the master node, enter the command:
# vxdctl -c mode
2
On the master node, list which disk groups are shared by entering:
# vxdg -s list
3
Using the diskgroup names displayed by the previous command, list the disk
groups that have volumes on which FastResync is set:
# vxprint -g diskgroup -F "%name" -e "v_fastresync"
4
Reattach each snapshot:
# vxassist -g diskgroup -o nofmr snapback snapshot_volume
5
If you are upgrading from VxVM 3.5 Maintenance Patch 3 or from VxVM 3.2
Maintenance Patch 5, set FastResync to off for each volume:
# vxvol -g diskgroup set fastresync=off volume
Configuring Veritas File System
After installing Veritas File System, you can create a file system on a disk slice or
Veritas Volume Manager volume with the mkfs command. Before you can use this
file system, you must mount it with the mount command. You can unmount the
file system later with the umount command. A file system can be automatically
mounted at system boot time if you add an entry for it in the following file:
/etc/fstab
The Veritas-specific commands are described in the Veritas File System guides
and online manual pages.
See the Veritas File System Administrator’s Guide.
vxtunefs command permissions and Cached Quick I/O
By default, you must have superuser (root) privileges to use the
/opt/VRTS/bin/vxtunefs command. The vxtunefs command is a tool that lets
you change caching policies to enable Cached Quick I/O and change other file
Configuring Veritas Storage Foundation Cluster File System
Configuring Veritas Storage Foundation Cluster File System manually
144