
Veritas Storage Foundation 5.1 SP1 Cluster File System Administrator"s Guide (5900-1738, April 2011)

4
Find the alternative disk groups available to replace the current coordinator
diskgroup.
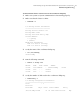
# vxdisk -o alldgs list
DEVICE TYPE DISK GROUP STATUS
c4t0d1 auto:cdsdisk - (vxfendg) online
c4t0d2 auto:cdsdisk - (vxfendg) online
c4t0d3 auto:cdsdisk - (vxfendg) online
c4t0d4 auto:cdsdisk - (vxfencoorddg) online
c4t0d5 auto:cdsdisk - (vxfencoorddg) online
c4t0d6 auto:cdsdisk - (vxfencoorddg) online
5
Validate the new disk group for I/O fencing compliance. Run the following
command:
# vxfentsthdw -c vxfendg
See “Testing the coordinator disk group using vxfentsthdw -c option”
on page 74.
6
If the new disk group is not already deported, run the following command to
deport the disk group:
# vxdg deport vxfendg
7
Make sure that the /etc/vxfenmode file is updated to specify the correct disk
policy.
See the Veritas Storage Foundation Cluster File System Installation Guide for
more information.
8
From any node, start the vxfenswap utility. For example, if vxfendg is the
new diskgroup that you want to use as the coordinator diskgroup:
# vxfenswap -g vxfendg [-n]
The utility performs the following tasks:
■ Backs up the existing /etc/vxfentab file.
■ Creates a test file /etc/vxfentab.test for the diskgroup that is modified on
each node.
■ Reads the diskgroup you specified in the vxfenswap command and adds
the diskgroup to the /etc/vxfentab.test file on each node.
■ Verifies that the serial number of the new disks are identical on all the
nodes. The script terminates if the check fails.
91Administering Storage Foundation Cluster File System and its components
Administering I/O Fencing