
VERITAS Storage Foundation 4.1 Cluster File System HP Serviceguard Storage Management Suite Extracts, December 2005


Starting VEA
32 Installation and Administration Guide
Starting VEA
The VERITAS Enterprise Administrator (VEA) is the graphical administrative interface
for configuring shared storage devices used for CFS. The VEA GUI server package,
VRTSob, is installed by the installer script on all nodes. To use VEA, the client
package, VRTSobgui, must also be installed. The VEA client can be a node in the cluster
or a remote system. If installed on a remote system, VEA can be used to configure storage
for multiple clusters. See the VERITAS Volume Manager Installation Guide for more
information on installing and starting the VERITAS Enterprise Administrator.
The information on VEA presented in the following procedure is sufficient to create a
shared disk group, a shared concatenated volume, and a cluster file system. For detailed
information about using VEA, see the VERITAS Volume Manager User s Guide – VERITAS
Enterprise Administrator.
1. Choose a node or remote system and install the VEA client package (see “Veri fy in g
the Configuration Files” on page 22 for information on the CD mounting procedure):
# swinstall –s /dvdrom/depot VRTSobgui
2. To start the VEA GUI, enter:
# /opt/VRTS/bin/vea &
The VEA application will open and you can begin creating disk groups.
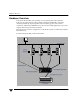
Creating a Dynamic (Shared) Disk Group
In the VEA GUI, use the New Dynamic Disk Group procedure on the CVM master node
to create a dynamic disk group. Click the Cluster Nodes icon to find which cluster node
is the master. Disks must be placed in dynamic disk groups before they can be used by
CVM. The default disk group (rootdg) is usually created during VxVM installation and
always exists on a system running VxVM. You can create additional dynamic disk groups
to organize disks into logical sets. You cannot make rootdg a shared disk group.
When you place a disk under VxVM control, the disk is initialized. Initialization destroys
any existing data on the disk.
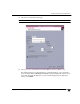
▼ To create a new dynamic disk group
1. Select the Disk Groups folder, or select a disk.
2. Select Actions > New Dynamic Disk Group. The New Dynamic Disk Group wizard
screen appears.
3. Click Next to continue. A new screen appears.