Veritas Enterprise Administrator 5.
Legal Notices © Copyright 2008 Hewlett-Packard Development Company, L.P. Publication Date: 2008 Confidential computer software. Valid license from HP required for possession, use, or copying. Consistent with FAR 12.211 and 12.212, Commercial Computer Software, Computer Software Documentation, and Technical Data for Commercial Items are licensed to the U.S. Government under vendor’s standard commercial license. The information contained herein is subject to change without notice.
Contents Chapter 1 Introducing the VEA console VEA features .......................................................................................................... 7 VEA home page ...................................................................................................... 9 Main window ........................................................................................................10 Quick access bar ......................................................................................
6 Contents Tasks View .................................................................................................... 25 Properties of an object ................................................................................ 26 Performing tasks ................................................................................................. 26 Running tasks from the menu bar ........................................................... 26 Running tasks from a popup menu ................................
Chapter 1 Introducing the VEA console The Veritas Enterprise Administrator (VEA) Console displays data about application objects and connectivity in graphical form and provides a user interface for the many tools and functions. Before using the VEA GUI, you should familiarize yourself with the following introductory topics: ■ VEA features ■ VEA home page ■ Main window VEA features You use the VEA to administer disks, volumes, and file systems on local or remote machines.
8 Introducing the VEA console VEA features and browse through all of the objects on the system or view detailed information about a specific object. ■ Remote Administration Administrators can perform administration remotely or locally. The VEA client runs on UNIX, Linux, or Windows machines. ■ Java-based Interface A pure Java-based interface is used. Administrators can run VEA as a Java application. ■ Scalability ■ VEA can handle systems containing large numbers of disks.
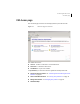
Introducing the VEA console VEA home page VEA home page The VEA home page is the first screen displayed when you invoke the VEA. Figure 1-1 VEA home page and Assistant The toolbar shows icons: ■ Connect - to make a connection to a VEA-enabled host. ■ Disconnect - to disconnect from a host.
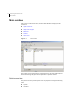
10 Introducing the VEA console Main window Main window Once you are connected to a host, the VEA Main Window is displayed. This consists of: ■ Quick access bar ■ Object tree and grid ■ Menu bar ■ Toolbar ■ Status area Figure 1-2 Main window The toolbar can be separated from, and reattached to, the main window (this is known as docking). The grid can be replicated in a separate window.
Introducing the VEA console Main window ■ Logs ■ Control Panel Object tree and grid The VEA main window is divided into two main panes: ■ Left Pane (Object Tree) ■ Right Pane (Grid) Object Tree Any host machines connected to the current VEA client session typically appear as nodes in the object tree.. Grid The right pane contains a grid, which is a tabular display of objects and their properties.
12 Introducing the VEA console Main window Note: If any DCLI operations are performed, in order for the changes to be reflected in the GUI, an Actions->Rescan operation must be performed. ■ View The View menu enables you to select the view displayed on the VEA console: ■ Select Connection to switch between connected hosts. ■ Selecting Perspective allows you to choose the display mode (System, Assistant, and so on). ■ Select Home to return to the Home page.
Introducing the VEA console Multiple selections Console View When a host is selected, you can click on Console to bring up the Console View. This displays the most recent messages for the host. When a message is selected, additional information about that message is displayed. You can also double-click on a selected message to display message properties in the Console Message Details dialog. Select Configure this view to bring up the Preferences dialog, if you want to change the buffer and filter settings.
14 Introducing the VEA console Opening a new window Clearing finished tasks Tasks are persistent in the Tasks console. To remove completed tasks from the window, select Clear All Finished Tasks from the popup menu. Viewing task properties To view task properties and the low-level commands used to perform a task, select the task and choose Properties from the popup menu.
Chapter 2 Using the VEA The Veritas Enterprise Administrator (VEA) enables you to access all hosts on your network. It also provides task and setup functions that allow you to tailor your VEA environment prior to performing storage management procedures on those hosts.
16 Using the VEA Setting up your system Setting up your system VEA consists of a server (vxsvc) and a client (vea). You must install and run the VEA server on a UNIX machine running VxVM. You can install and run the VEA client on any Windows, HP, Linux, Solaris, or AIX machine that supports the Java Runtime Environment. Before you can use VEA, you need to: 1 Install VxVM on the machine to be administered. 2 Install the VEA server and client on the machine to be administered.
Using the VEA Starting VEA Using the command line To invoke VEA from the command line: 1 Go to the directory where the VEA client is installed, for example: Object Bus\bin 2 Start the VEA client by running the batch file vea.bat from this location. When starting the VEA client from the command line, the following options are available -v Shows the version of client console. -c Specifies the configuration file for advanced settings. -host Specifies the host to connect to.
18 Using the VEA Starting VEA Selecting an alternate profile Select one of the profiles from the list, and enter the password, if necessary. Click OK to log in. You can also select Tools > Manage Profiles to bring up the Manage Profiles dialog (refer to Managing user profiles). If no profiles exist If no profiles exist when you start VEA, the following message appears: No profiles exist on this system. A new default profile has been created.
Using the VEA Setting VEA preferences Setting VEA preferences You can set up your own individual preferences for running VEA using the VEA preferences feature.
20 Using the VEA Setting VEA preferences 2 Choose Add to Favorites from the popup menu. Removing a host from favorite hosts Use the following proedure to remove a host from Favorites: 1 In the Preferences Favorites window, highlight the host to be removed. 2 Click on Remove. Reconnecting hosts By default, hosts under the Favorites are reconnected when logging on. (Reconnect At Logon is set to Yes). You can avoid a host being reconnected at startup by setting Reconnect At Logon to No.
Using the VEA Setting VEA preferences Setting advanced preferences The Advanced tab displays the allows you to set the action for temporary files, and to reset preference settings. Deleting temporary files on exit You can delete all temporary files when you leave VEA by selecting the checkbox Delete temporary files on exit. If you want to delete the temporary files immediately, click the button Delete Now. Restoring default values Select Restore Defaults to restore application and system default values.
22 Using the VEA Viewing objects and object properties When the limit is reached, messages are discarded, starting at the oldest message. Filter messages You can filter messages in the Console View by selecting the Activate Filter checkbox. Only messages that meet all the defined criteria (Severity, Source, and Classification) will be displayed.
Using the VEA Viewing objects and object properties ■ Console View, at the bottom ■ Tasks View, at the bottom The following functions are provided for simplifying viewing objects in the tree and Tabular View: ■ To expand or collapse the hierarchy under a particular object group node in the tree: Click on the plus sign (+) or minus sign (-) icon next to that node. ■ To display the objects in an object group listed in the object tree: Click on the object group.
24 Using the VEA Viewing objects and object properties and holding the mouse button while dragging the pointer over the desired objects. Navigational View Navigational View supports object browsing and operations on those objects in a tree structure. The following nodes typically appear in this view: ■ System nodes: representing the connected and disconnected computer systems, these are distinguished by icons. ■ Network nodes: listing the systems that are currently running on the given domain.
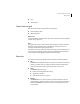
Using the VEA Viewing objects and object properties Details View The Details View (Figure 2-1) gives a tabular representation of the objects in a particular group node, or even a single object, depending upon the selection in the Navigational View. Figure 2-1 Details View Console View The Console View displays the active events and alerts for the connected hosts. Click on Console to display the events that have been received by the client during the user session.
26 Using the VEA Performing tasks Properties of an object Each property has the following attributes: Table 2-1 Property attributes Property type Definition Type Defines the property value; for example, boolean, integer with varied size, and string. Flags Determines one of the characteristics of the property (for example, Hidden or Displayable). Name Identification given to the property. Value Value assigned to property, depending upon the type. A property set is a collection of properties.
Using the VEA Performing tasks Running tasks from a popup menu Once you have connected to a host, you can use a context-sensitive popup menu to launch a task on the selected object. A popup menu provides access to tasks or options appropriate for the selected object. Popup menus are available in the main window and most other windows. ◆ To perform a task on an object with the popup menu, right-click on the object and choose the appropriate task in the popup menu.
28 Using the VEA Connecting and disconnecting hosts and domains Connecting and disconnecting hosts and domains The system host typically has multiple Symantec products installed on it. To be able to use the products, client console needs to connect to the system through an authentication channel. VEA can access and display multiple host machines simultaneously.
Using the VEA Connecting and disconnecting hosts and domains Note: Entries for the user name and password must exist in the password file or corresponding Network Information Name Service (NIS) table on the machine to be administered. Logon authentication There are three authentication mechanisms by which a connection can be established with the server. ■ Silent Logon (Windows platforms only): This happens when the server is local; that is, the VEA client and server both are running on the same machine.
30 Using the VEA Exiting the VEA client Switching between connected hosts‘ You can switch the VEA console display between connected hosts: ■ Select View > Connection. ■ Select the host to be displayed from the list of connected hosts displayed. The display changes to show information for the selected host. Exiting the VEA client To exit the VEA client, choose File > Exit. It is also possible to close the client by using the close button available at the top right of the window.
Using the VEA Viewing the Alert Log Figure 2-3 Control Panel Viewing the Alert Log The alert log resides on the server, and records information such as alerts raised, about the server. After connecting to the host (server), you can display a snapshot of the log information by clicking on Logs then the Alert Log tab. The server can have single or multiple alert log files, depending upon the policy.
32 Using the VEA Viewing the Alert Log Figure 2-4 Alert Log Previous and next alert sets The Previous and Next set of alerts buttons are situated below the Details View. You can display the next set of alerts by clicking the “Next set of Alerts” button. The current set of alerts is then replaced with the next set of alerts. If there are no more alerts in the event log, the current set continues to be shown. You can display the previous set of alerts by clicking the “Previous set of Alerts” button.
Using the VEA Viewing the Task Log Figure 2-5 Alert Details Viewing the Task Log The task log resides on the server, and is similar to the event log; but records information about task objects. You can display a snapshot of the task log information on the client. After connecting to the host (server), you display the task log of the server by selecting the “TaskLog” node under “Logs” in the tree view. The server can have single or multiple task log files, depending upon the policy.
34 Using the VEA Configuring logs Task details You can view the details for particular task. Select the task and click on “Details.” A new window opens up to show the task details. Configuring logs You can configure the server task and alert logs from the client: 1 Select the “control panel” node in the tree view. The details view appears, listing all the configuration applications. 2 Launch the “Log Settings” configuration application by double clicking on it.
Using the VEA Managing user profiles Figure 2-6 User Profiles Selecting a startup profile A default startup profile (Default) is created by VEA when it is invoked by the first time. The Default profile is particularly useful when VEA is being used in a single user environment, in which case, you can use the Default profile rather than creating additional profiles. You cannot delete or modify the Default profile, and it is not password protected.
36 Using the VEA Firewall support Note: You must remember this password, for there is no way of retrieving a lost password, and the profile cannot then be deleted at a later stage. (A blank password or a password consisting of spaces alone will not be considered for a password, and the profile will be marked as not having a password.) Changing your password Select the profile, and then click Edit to change the password for the profile. This brings up the Edit Profile dialog.
Using the VEA Firewall support Example 1 If a.b.c.d is a firewall machine, then: Port 1234 on a.b.c.d = 2148 on veaserver1, and Port 3456 on a.b.c.d = 2148 on veaserver2 ... and so on. Now, if the client wishes to connect to veaserver1 then, it should specify the following in the connection box: a.b.c.d:1234 This then connects to veaserver1 and displays veaserver1 in the connected hosts, history and favorites databases.
38 Using the VEA Firewall support Example 3 For the case where 2148 is forwarded through the firewall (punch through): 1 Let machines A and B be the servers on the secure side of the firewall. 2 Let client be on the internet/intranet side client ---> firewall ---> A|B 3 Configure TCP/IP routing on the client such that packets destined for A|B are routed to firewall F. 4 Add A and B to /etc/hosts (or equivalent) for name resolution if required.
Chapter 3 Accessibility Accessibility is enhanced by the use of: ■ Keyboard shortcuts ■ Dialog boxes Keyboard shortcuts Keyboard shortcuts are possible using accelerators and mnemonics. Accelerators Accelerators are key combinations that provide shortcut access to GUI functions. They allow you to use a computer from the keyboard, rather than using the mouse.
40 Accessibility Keyboard shortcuts Mnemonics Mnemonics are single key strokes, used to activate components such as menu items. A single mnemonic is equivalent to a mouse click. A mnemonic can be used to select a menu item by pressing the key to go into menu pull-down mode, pressing a single key to open a menu and another key to select a menu item.
Accessibility Keyboard shortcuts VEA additions to Microsoft keyboard conventions Table 3-2 summarizes the keyboard additions to the Microsoft keyboard conventions in the VEA implementation of mnemonics and accelerators: Table 3-2 VEA additions to Microsoft keyboard conventions Convention Mnemonic Accelerator Actions A Alt A. Use this accelerator in place of Shift+F10 with a selected item to bring up the context menu with the Actions menu.
42 Accessibility Dialog boxes VEA help additions to Microsoft keyboard conventions Table 3-3 summarizes the keyboard additions to the Microsoft keyboard conventions in the VEA implementation of mnemonics and accelerators: Table 3-3 VEA and applications help additions to Microsoft keyboard conventions Convention Mnemonic Accelerator Find in Topic… F Ctrl + F Find Next N F3 Find Previous P None Hide Navigation Tabs H None Index I None Print P None Search S None Synchronize N None
Accessibility Dialog boxes A dark border initially indicates the default button. Press ENTER at any time to choose the button with a dark border. Use TAB to move the keyboard focus to the next control, and add SHIFT to reverse the direction. When you move the keyboard focus to a command button it temporarily takes the dark border, but when the keyboard focus is not on a command button the dark border returns to the default button. Press SPACEBAR to choose the command button you selected with TAB.
44 Accessibility Dialog boxes List boxes display a column of available choices. If there are more choices than can fit in the open list box, moving the selection through the list will scroll more choices into view. Use TAB or type the appropriate access key to move the focus to the list box. Single selection list boxes allow only one item to be selected from the list at a time. Use the UP ARROW or DOWN ARROW keys to select items. Moving to a second item will automatically deselect all other items.
Glossary Action menu A context-sensitive menu that changes its menu options to match the type of object that is selected. By default, the Action menu is greyed out. When an object is selected, the Action menu provides access to tasks appropriate for the selected object. alert An indication that an error or failure has occurred on an object on the system. When an object fails or experiences an error, an alert icon appears.
46 Glossary children Objects that belong to an object group. cluster A set of host machines (nodes) that shares a set of disks. cluster file system See CFS. command log A log file that contains a history of Veritas Volume Manager (VxVM) tasks performed in the current session and previous sessions. Each task is listed with the task originator, the start/finish times, the task status, and the low-level commands used to perform the task. DCO Data Change Object See DCO.
Glossary dock To separate or attach the main window and a subwindow. DRL A VxVM mechanism that tracks mirror write inconsistency which helps in fast resynchronization of mirrors after system crash. Even though the term log is used, internally DRL is implemented as a map. Dynamic Multipathing See DMP. enclosure A disk array. FastResync A VxVM feature for fast resynchronizing of stale mirrors at the time of reattach which were earlier split off as a result of snapshot or detach operation.
48 Glossary menu bar A bar that contains a set of menus for the current window. The menu bar is typically placed across the top of a window. mirror A copy of a volume and its data. There can be several mirrors per volume. The terms mirror and plex are used synonymously. node In the VxVM tree, a node is an element attached to the tree. In a cluster environment, a node is a host machine in a cluster. object group A group of objects of the same type. Each object group has a group icon and a group name.
Glossary Search window The VERITAS Volume Manager search tool. The Search window provides a set of search options that can be used to search for objects on the system. splitter A bar that separates two panes of a window (such as the object tree and the grid). A splitter can be used to adjust the sizes of the panes. status area An area of the main window that displays an alert icon when an object fails or experiences some other error.
50 Glossary Volume Layout Details Window A window that displays a graphical view of a volume and its components. The objects displayed in this window are not automatically updated when the volume properties change. Volume to Disk Mapping Window A window that displays a tabular view of volumes and their underlying disks. This window can also display details such as the subdisks and gaps on each disk.
Index A H accelerators 39 accessibility 39 accessing tasks 26 Actions menu 11 add a host 19 advanced preferences setting 21 alert logs 31 alerts icons 12 help 12 Help menu 12 hosts accessing multiple hosts 8 defined 11 C client 16 configuring logs 34 connection preferences 19 control panel 30 D DCOM authentication 29 details view 25 dialog boxes accessibility 40 disconnecting from a remote computer 29 displaying object properties 22 objects 22 E editing keys 40 F Favorites 19 File menu 11, 26 G gri
52 Index monitoring alerts 12 multiple host support 8 N Native Logon 29 navigational view 24 O object properties 26 object tree 11 objects displaying 22 selecting 23 sorting 23 viewing 22 Options menu 11 P perspective 20 popup menus 27 preferences connection 19 Options menu 11 setting 11 Previous/Next Alerts 32, 33 printing views 34 PropertySet 26 R Reconnect at Logon 20 remote administration 8 Remove From Favorites 20 rescan 11 running tasks 26 running tasks using Task Assistant 27 S security 8, 16 S
Index resizing 11 53
54 Index