
LVM Volume Group Dynamic LUN Expansion (DLE) and Contraction (DLC) (September 2009)
11
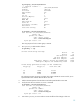
For a root volume group:
Boot into maintenance mode):
# cd / ; shutdown –r now
Interact with boot process:
ISL> hpux -lm
# vgmodify -v –e 2000 –p 150 vg02
# Same options and arguments as in
the previous step but without –r.
# vgchange –a y –s vg02
# Verify the volume group activates with the new settings
# vgchange –a n vg02 # Deactivate volume group
# reboot
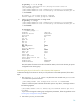
Performing an offline DLC
For an offline DLC, you must specify the size to which the physical volume must be reduced along with
–C option. Specify the size in megabytes(m), gigabytes(g) , terabytes(t) or petabytes(p).
1. After deciding the correct size to which the physical volume must be contracted, use the
vgmodify command to perform DLC from the LVM end.
2. You must use the review mode to ensure that a DLC on the disk now yields the desired results.
Specify only one path with the –C option as follows:
# vgmodify –r –a –C dlc_size vg1 /dev/rdisk/disk53
#Note –r, review mode.
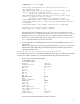
3. Analyze the output of the preceding command and take the steps suggested by the review
command. Then, perform the actual DLC operation in change mode with the suitable size.
Before performing this operation, deactivate the volume group. For example:
# vgmodify –a n vg1
# vgmodify –a –C dlc_size vg1 /dev/disk/disk53
#Note, same options and arguments as in
the previous step, but without –r option.
# vgmodify –a y vg1
For handling the root and non-root volume groups, see the preceding Performing an offline DLE
se
ction.
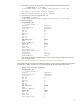
Changing the volume group configuration
1. Run the vgmodify command with the –t option, which displays the range of values
(max_pv, max_pe, and disk size) to which the volume group can be tuned. Note: You can
run the vgmodify –t operation against an activated or deactivated volume group.
# vgmodify –t –v vg02 # Table without physical extent renumbering
(For more information, see the section on physical extent renumbering.)
# vgmodify –t –v –n vg02 # Table with physical extent renumbering
2. Review the output and select the new values to which the volume group must be configured.
You must free up the first physical extent on any physical volume as required, by using
pvmove, lvreduce, or lvremove.
3. Use the –r option to check if the new values selected can be applied.
# vgmodify –r –v –e 2000 –p 150 vg02 # Note –r, review mode.
# vgmodify -r -o vg05 # For optimizing the volume group
4. Deactivate the volume group and run vgmodify to apply the new settings.
# vgmodify –a n vg02
# vgmodify –v –e 2000 –p 150 vg02